


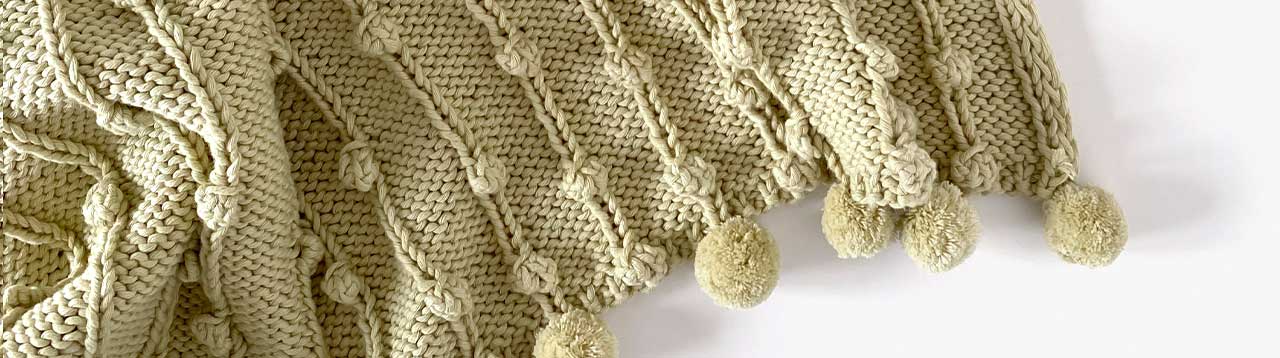
Hey Creative! Today, I’m sharing the pattern for the Falling Blanket, a simple yet charming knitted baby blanket. Its design features unique details, like the bobbles that resemble little leaves or falling snowflakes, and the pom-pom border that adds a special touch.
The best part? It’s super easy to knit, using basic stitches, making it the perfect project for both beginners and experienced knitters

What makes it truly unique is that it’s handmade, with all the love and care that only something crafted by you can bring. It’s the kind of gift that not only keeps you warm but also creates lasting memories and emotions, because you know it was made with someone very special in mind.
Materials
4 skeins of 100g Cotton Fresh in color Sand (100g = 142m). Aran / Medium / Worsted weight.
5mm straight knitting needles (or the size needed to achieve the gauge).
Tapestry needle
Gauge
10×10 cm = 17 stitches x 23 rows in stockinette stitch.
It’s essential to knit a gauge swatch to ensure it matches the pattern, so you can achieve the correct measurements.
Stitches, Techniques, and Abbreviations
- Cast on stitches
- Knit stitch (k)
- Purl stitch (p)
- 1×1 Ribbing
- Bobbles (bob)
- Ribbing Bind off
1×1 Ribbing
This stitch is reversible and perfect for edges, cuffs, or collars.
Cast on the indicated number of stitches.
With your left hand, hold the needle with the stitches.
Slip the first stitch as if to knit it.
Knit the next stitch.
Purl the next stitch.
Continue this pattern (1 knit stitch, 1 purl stitch) until the end of the first row.
Switch hands with the needles.
Slip the first stitch as if to purl, then knit the stitches as they appear—knit the knit stitches and purl the purl stitches.
5×1 Ribbing
This ribbing is knitted in the same way as the 1×1 ribbing, but this time, we will knit 5 knit stitches and 1 purl stitch.
It consists of two rows:
Knit Row (right side):
Slip the first stitch as if to knit, then purl 1 purl stitch, knit 1 stitch, purl 5 stitches, knit 1 stitch, purl 5 stitches. Repeat this pattern until only 3 stitches remain on the left needle. Knit 1 stitch, purl 1 stitch, and knit 1 stitch.
Purl Row (wrong side):
Slip the first stitch as if to purl, then knit 1 stitch, purl 1 stitch, knit 5 stitches, purl 1 stitch, knit 5 stitches. Repeat this pattern until only 3 stitches remain on the left needle. Purl 1 stitch, knit 1 stitch, and purl 1 stitch.
Bobble (Bob)
When you get to the point where you need to make the bobble, insert the right needle into the stitch and knit it without fully removing it from the left needle. Bring the yarn to the front, then knit 1 knit stitch into the same stitch. This will create three stitches from one.
Turn the work and purl these three stitches.
Turn the work again and knit 2 stitches. Lift one stitch over the other, move the stitch from the right needle to the left, and knit the two stitches together. You’ve now made a bobble.
Continue knitting as usual, following the pattern instructions until you need to make another bobble.
Ribbing bind off
Slip the first stitch knitwise to the right needle, then purl the next stitch. Bring the yarn to the back, and with the left needle, lift the stitch from the right needle over the previous stitch. You’ve now bound off the first stitch. Knit the next stitch, then lift the previous stitch over it.
Continue knitting the stitches as they appear, lifting one stitch over the other, until no stitches remain. Cut the yarn, thread it through the last stitch, and pull to tighten.
How to Knit the Falling Baby Blanket: A Step-by-Step Guide
Row 0. Cast on 113 stitches.
Rows 1 and 2. Work in 1×1 Ribbing
Row 3. Bobble Row. Slip the first stitch knitwise, p 1, k 1 , p 5 , BOB, p 5, *k 1, p 5 , BOB, p 5*, repeat from *to* until only 3 stitches remain on the left needle, k 1, p 1, k 1.
Rows 4-6. (3 rows). Work in 5×1 Ribbing, starting with the purl row.
Row 7. Bobble Row. Slip the first stitch knitwise, p 1, k 1 , p 5 , k 1 , p 5 ,k 1 , p 5 , *BDQ, p 5, k 1, p 5* repeat from *to* until only 3 stitches remain on the left needle, k 1, p 1, k 1.
Rows 8-10. (3 rows) .Work in 5×1 Ribbing, starting with the purl row.
Row 11. Bobble Row. Repeat row 3
Rows 12-16. (5 rows). Work in 5×1 Ribbing, starting with the purl row.
Row 17. Bobble Row. Repeat row 7
Rows 18-22. (5 rows). Work in 5×1 Ribbing, starting with the purl row.
Row 23. Bobble Row. Repeat row 3
Rows 24-30. (7 rows). Work in 5×1 Ribbing, starting with the purl row.
Row 31. Bobble Row. Repeat row 7
Rows 32-38. (7 rows). Work in 5×1 Ribbing, starting with the purl row.
Row 39. Bobble Row. Repeat row 3
Rows 40-48. (9 rows). Work in 5×1 Ribbing, starting with the purl row.
Row 49. Bobble Row. Repeat row 7
Rows 50-60. (11 rows). Work in 5×1 Ribbing, starting with the purl row.
Row 61. Bobble Row. Slip the first stitch knitwise, p 1, k 1, p 5, BOB, p 5, *k 1 , p 5, k 1, p 5, k 1, p 5, BOB, p 5 *, repeat from *to* until only 3 stitches remain on the left needle, k 1, p 1, k 1.
Rows 62-74. (13 rows). Work in 5×1 Ribbing, starting with the purl row.
Row 75. Bobble Row. Slip the first stitch knitwise, p 1, k 1, p 5, k 1, p 5, *k 1, p 5, BOB, p 5, k 1, p 5, k 1, p 5 *, repeat from *to* until only 3 stitches remain on the left needle, k 1, p 1, k 1.
Rows 76-90. (15 rows). Work in 5×1 Ribbing, starting with the purl row.
Row 91. Repeat row 61
Rows 92-108. (17 rows). Work in 5×1 Ribbing, starting with the purl row.
Row 109. Repeat row 75
Rows 110-128. (19 rows). Work in 5×1 Ribbing, starting with the purl row.
Row 129. Bobble Row. Slip the first stitch knitwise, p 1, k 1, p 5, BOB, p 5, * k 1, p 5 *, repeat from * to * 6 more times, BOB, p 5, repeat from * to * 7 more times, BOB, p 5, k 1, p 1, k 1.
Rows 130-150. (21 rows). Work in 5×1 Ribbing, starting with the purl row.
Row 151. Bobble Row. Slip the first stitch knitwise, p 1, *k 1, p 5*, repeat from * to * 4 more times, BOB, p 5, repeat from * to * 7 more times, BOB, p 5, repeat from * to * 4 more times, k 1, p 1, k 1.
Rows 152-188. (37 rows). Work in 5×1 Ribbing, starting with the purl row.
Row 189. Work in 1×1 Ribbing
Row 190. Bind off all stitches.
Finishing
Weave in any loose ends.
To give your blanket the perfect shape, even out the stitch tension, and define the pattern, it’s best to block it once you’re done.
Follow these steps:
- Lightly dampen the item using a spray bottle.
- Stretch the item on a padded surface and pin it into shape.
- Spray again until it is sufficiently damp.
- Let your blanket rest, with the pins still in place, until it is completely dry before removing the pins.

Pom-poms
Finally, make 10 pom-poms as follows:
- Wrap the cotton around your index and middle fingers about 25 times, then cut the yarn.
- Cut a small piece of cotton and tie it tightly around the center, making sure everything is secure. To prevent the pom-poms from coming apart, you can sew a few stitches in the center with a regular needle and thread.
- Cut the loops on both ends.
- To finish, trim any excess yarn until the pom-pom is round.
Once all 10 pom-poms are finished, sew them onto the bottom edge of the blanket.
Your blanket is now ready to impress!


I hope you enjoy knitting the Falling Blanket as much as I enjoyed designing it. This pattern is a wonderful way to add a special touch to any baby layette or as a decorative piece for your home.
Its combination of elegant design, ease of knitting, and charming details like the bobbles and pom-poms make it the perfect gift for a special baby. Nothing says “I love you” like a handmade project crafted with love 🥰.
If you decide to make it, I’d love to see your creation; don’t forget to tag me on social media or leave a comment with your photos. Happy knitting and see you in the next project!
Best,
 BUTTONY Crochet Romper – Pattern and Tutorial