


The Knitted Girly Vest that I show you today is one of those clothes that should not be missing in a kid’s closet. Combine it with a worn denim shirt and you will get a modern look that will attract attention wherever you go.
This pattern is one of the easiest to make due to its simplicity and since it is knitted with a thick yarn and large needles, you will have it finished and ready in no time.
Stiches used to knit the Knitted Girly Vest
All the stitches that we will use for the project today are very basic and simple, suitable for all levels:
- Cast on
- Garter stitch
- Knit 2 stitches together
- Pick up stitches
- Bind off
Materials to make the Knitted Girly Vest
On this occasion, the materials you will need to make a 18 months size are:
- 1 ball of 100 grams of yarn for 5 mm needles. The yarn that you see on this tutorial is
- The MeriWool from We Are Knitters in salmon.
- 5 mm needles
- 1 wooden button
- A tapestry needle
[amazon_link asins=’B00V4OPJM0′ template=’ProductGrid’ store=’creativaateli-20′ marketplace=’US’ link_id=’caeeb144-d84a-11e8-9acf-9f48e46f5bf5′]
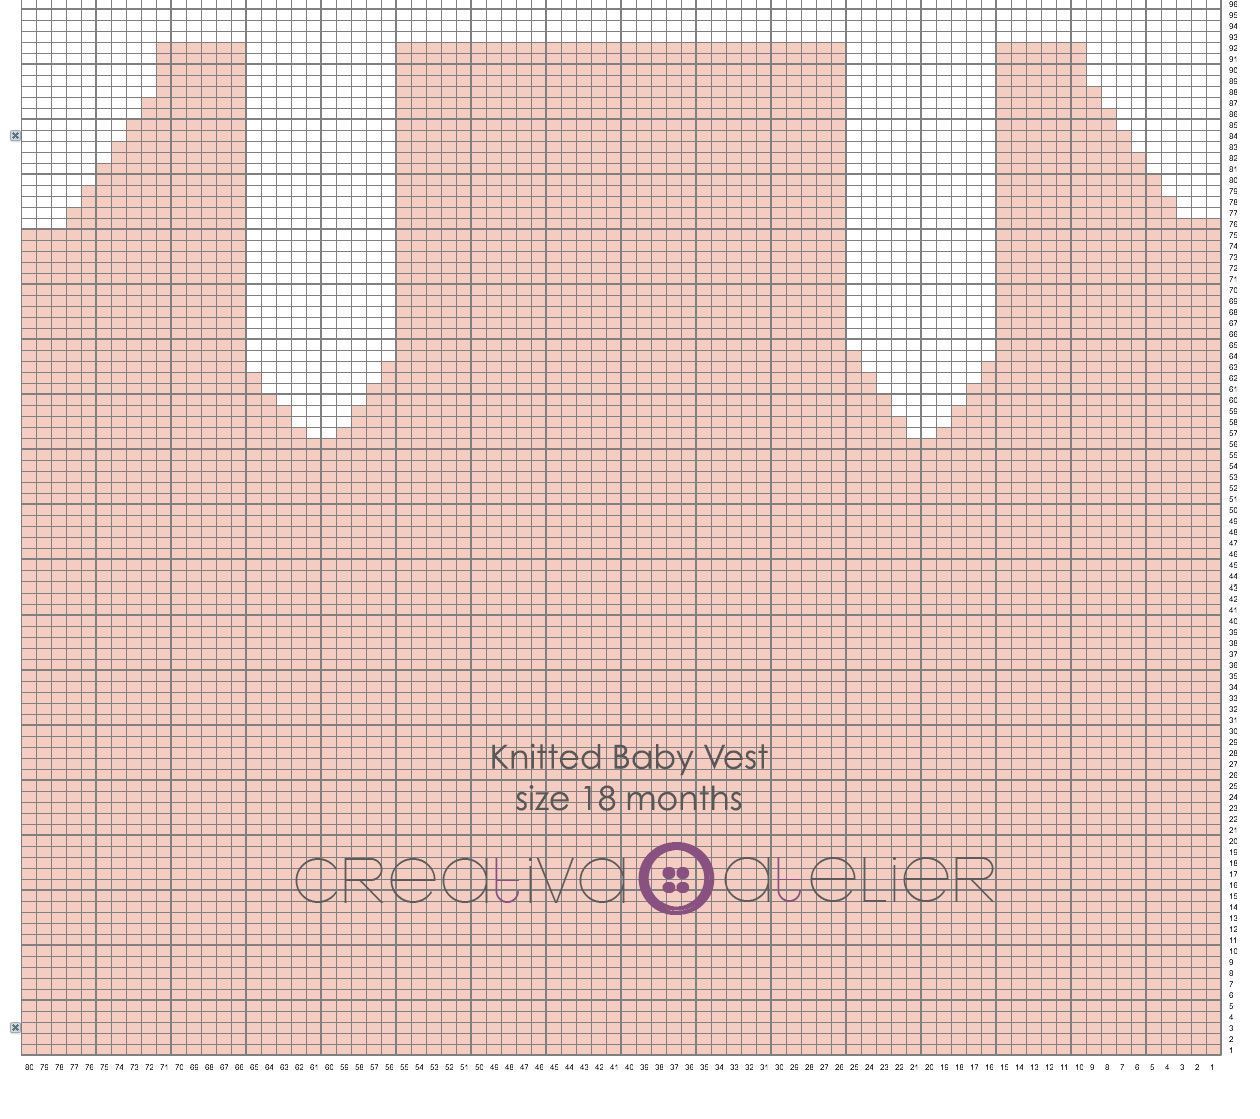
Step by step on how to knit a Baby Girly Vest
Size 18 months
1. Knit the base of the knitted Girly Vest
Start by casting on 80 stitches and knit in Gartner stitch for 28 turns (56 rows) or until your knitting reaches up to 21 cm.

2. Knit the openings for the armholes
Knit the opening of a front
Once knitted 56 rows, began to shape the armholes of the Knitted Girly Vest.
Knit 21 stitches, cast off two stitches (pass the second to last stitch over the last one, knit one stitch and again pass over another to cast off), knit all stitches until there are 19 stitches, cast off two stitches and knit the remaining stitches.

The distribution of the stitches will have remained as follows:
- 19 stitches for a front
- 2 cast off stitches
- 38 stitches of the back
- 2 cast off stitches
- 19 stitches of the other front

On the next row, knit until 3 stitches remain, knit 2 stitches together and knit the last stitch. Turn the work over and knit the whole row normally.
Continue in this way, knitting two stitches together and 1 stitch, each time 3 stitches remain to reach the opening of the armhole.
Once you have these 15 stitches, knit 13 more rows.

At this point you should have all the stitches on the same needle. Cast off 3 stitches and knit the row normally. You must knit 2 stitches together each time you reach the area of the neck opening until you get 6 stitches.

Once you have 6 stitches, knit 4 rows and cast off all the stitches.
Knit the opening of the back
Continue knitting the 38 central stitches to shape the armholes of the easy knitted Girly Vest. In this case, you should make a decrease on each row. When you have 3 stitches to finish the rows, knit 2 stitches together and knit the last stitch. Continue decreasing in this way until you get 30 stitches.
Knit 28 more rows and cast off all the stitches.

Knit the opening of the other front
To finish the base of the knitted Girly Vest, you will have to knit the remaining front part. In this case, knit the same way as you did for the first one.
- Knit 2 stitches together and 1 stitch, each time there are 3 stitches left to reach the opening of the armhole until 15 stitches remain on the needle
- Knit 13 more rows
- Cast off 3 stitches for the neck and knit the row normally.
- Knit 2 stitches together each time you reach the area of the neck opening until you get 6 stitches.
- Knit 4 rows and cast off all stitches


3. Knit the ruffles of the sleeves
Once the knitted vest is formed by joining together the shoulders, you will have to pick up 26 stitches by inserting a needle through the loops that have formed on the selvage. Remember that for this, it is very important that you slip the first stitch of every row without knitting.
With these 26 stitches that you picked up, you will knit the ruffles of our Girly Vest in the following way:
- Row 1. Knit 6 stitches, increase 2 stiches from each the following 5 stitches, increase 3 stitches from the each of the following 4 stitches, increase 2 stiches from each the following 5 stitches and knit 6 stitches.
- Rows 2-7. Knit all the stitches in Garter stitch (44 stitches)
- Row 8. Cast off all stitches

4. Knit the crochet border
To improve the finish of your vest you will knit a border of slip stitch with a crochet hook. If you do not use crochet to finish your knitted projects, what are you waiting for! You do not have to be an expert in crochet or know the most intricate techniques, with a couple of the most basic stitches you can improve the edges of your fabric and vive that extra sophistication to your hand-knit garments.

When you reach the neck area, you will crochet the closure of your button. Crochet a chain of 6 (or the ones you need depending on the size of your button) and close it by making a slip stitch at the base of the chain.

Then, simply by sewing a button you will have your Knitted Girly Vest finished!


If you want to add a wooden label, like the one you see in the photos, with the inscription –Hand Made- to give it that special touch, I leave the link where I buy them for cheap.
[amazon_link asins=’B079JRMTT4′ template=’ProductGrid’ store=’creativaateli-20′ marketplace=’US’ link_id=’b50d934f-d84c-11e8-a112-d3be63f7c55a’]


I love how this girly vest goes with the cowboy look and the UGG booties. She uses them with everything!


If there was not yet a knitted vest among your repertoire of knitted baby garments, you already have a new project on your “to do” list! Easy, quick to knit, simple, economical and above all, modern.
If you are loving the ruffles of this Girly Vest, I am pretty sure that your are going to love this Baby Sweater with ruffles on the sleeves and this romantic Summer Set.
And remember, if you like this tutorial and it has been useful to you, comment below and share it, it is a free! And of course, once you have your Knitted Girly Vest, don’t forget to showcase your work on social media using the hashtags #girlyvest and #creativaatelier
Besos,

This pattern is for personal use only. Please do not claim this pattern as your own, or sell or distribute it. If you would like to share this pattern, please link to this site and do not repost the pattern on your site. You can sell finished items made from this pattern, but please link back and give credit to Creativa Atelier. Please, respect designers and their Intellectual Property. Thanks!
 Ruffles Baby Sweater – Knitting Pattern & Tutorial
Hi Marta,
Your patterns are just beautiful.
Can I purchase a pattern for this knitted girly vest? It is exactly what we have been looking for.
I have managed to buy another couple of patterns through the Shop but can’t find this one.
Many thanks Sharon
Hi Sharon,
I’m so glad you like the pattern!
Unfortunately, this design is only available in the size shown in the tutorial.
Best regards,
Hi Marta
I came across this vest quite by accident and now I have begun knitting it. It’s gorgeous.
Thank you!
Hi Marta, I am currently knitting ypur vest and am about to start the volants. Can you help me interpret correctly what is meant by: “Remember that for this, it is very important that you slip the first stitch of every row without knitting.“ When you pick up the stitch, i am not supposed to knit them? Or is this the oart of each row for the armhole where you slipstitched the last stitch of each row?
I am a bit confused and dont want to make anything wrong. Thank you so much! Best, Julia
.So sweet…your tutorial is crystal clear
Thank you very much.
Hi, I love this pattern! Would you have any pointers on how to make this vest in different sizes? I would like to make it for my 9 year old, but I don’t know how to size up the pattern to fit her. TIA
J’aimerai avoir le modèle en Français si c’est gratuit. Merci
Hello. How would suggest enlarging this pattern to make a size 2-3? I think for my daughter I’d want at least an extra inch in width and probably 1-2 inches in height as well. I’m not sure how to adjust the armhole measurements 🙂