


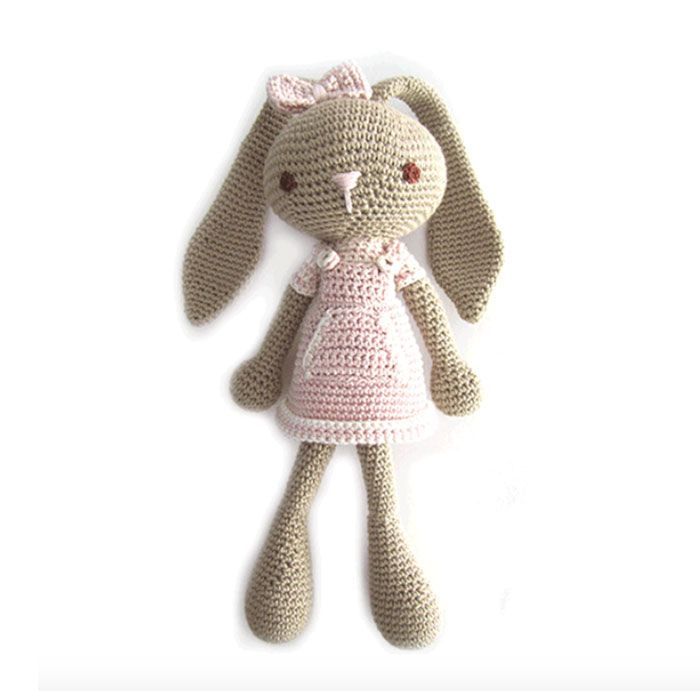
Today we have a tutorial full of colored wool and needles to make a Long Eared Bunny using the amigurumi technique, which will delight the little ones!
This crochet Long Eared Bunny is about 30 cm. tall if you use the same yarn and hook. The pattern can also work well with a yarn of other weight, but the size of finished crochet amigurumi will be different.
Supplies:
- 3 balls of fine cotton yarn in pink, brown and white colors.
- 2,75 mm crochet hook ( I choose Clover Soft Touch, my all time favorite)
- Polyester filling
- Scissors and tapestry needle.
Abbreviations:
- ch = chain
- st = stitch
- sc = single crochet
- sc2tog = decrease ( 2 sc together)
How to crochet an Amigurumi Long Eared Bunny
1. Crochet the Long Eared Bunny Head
- Round 1: Work 6 sc into a magic circle. (6)
- Round 2: Work 2 sc in each stitch around. (12)
- Round 3: Work *1 sc in next stitch, 2 sc in next stitch* 6 times. (18)
- Round 4: Work *1 sc in each of next 2 stitches, 2 sc in next stitch* rep around . (24)
- Round 5: Work *1 sc in each of next 3 stitches, 2 sc in next stitch* rep around . (30)
- Round 6: Work *1 sc in each of next 4 stitches, 2 sc in next stitch* rep around . (36)
- Round 7 : Work *1 sc in each of next 5 stitches, 2 sc in next stitch* rep around . (42)
- Round 8 : Work *1 sc in each of next 6 stitches, 2 sc in next stitch* rep around . (48)
- Round 9 : Work *1 sc in each of next 7 stitches, 2 sc in next stitch rep around . ( 54 )
- Round 10 : Work *1 sc in each of next 8 stitches, 2 sc in next stitch rep around . ( 60 )
- Round 11 : Work *1 sc in each of next 9 stitches, 2 sc in next stitch* rep around . ( 66 )
- Round 12: Work *1 sc in each of next 10 stitches, 2 sc in next stitch* rep around . ( 72 )
- Round 13 – 15: Work 1 sc in each s titch around. ( 72 )
- Round 16 : Work *1 sc in each of next 10 stitches, sc2tog next 2 stitches* rep around . ( 66)
- Round 17 : Work *1 sc in each of next 9 stitches, sc2tog next 2 stitches* rep around . (60)
- Round 18 : Work *1 sc in each of next 8 stitches, sc2tog next 2 stitches* rep around . ( 54 )
- Round 19 : Work *1 sc in each of next 7 stitches, sc2tog next 2 stitches* rep around (48)
- Round 20 : Work *1 sc in each of next 6 stitches, sc2tog next 2 stitches* rep around (42)
- Round 21 : Work *1 sc in each of next 5 stitches, sc2tog next 2 stitches* rep around . ( 36 )
- Round 22 : Work *1 sc in each of next 4 stitches, sc2tog next 2 stitches* rep around . ( 30 )
- Round 23 : Work *1 sc in each of next 3 stitches, sc2tog next 2 stitches* rep around . ( 24 )
- Round 24 : Work *1 sc in each of next 2 stitches, sc2tog next 2 stitches* rep around . ( 18 )
Stuff the head

2. Crochet the Long Eared Bunny Arms (X2)
- Round 1: Work 6 sc into a magic circle. (6)
- Round 2: Work 2 sc in each stitch around. (12)
- Round 3: Work *1 sc in next stitch, 2 s c in next stitch* 6 times. (18)
- Round 4 – 6 : Work 1 sc in each stitch around. ( 18 )
- Round 7 : Work *1 sc in each of next 4 stitches, sc2tog next 2 stitches* rep around . ( 15 )
- Round 8 : Work *1 sc in each of next 3 stitches, sc2tog next 2 stitches* rep around . ( 12 )
- Round 9 : Work *1 sc in each of next 2 stitches, sc2t og next 2 stitches* rep around . ( 9 )
- Round 10 – 20 : Work 1 sc in each stitch around. ( 9 )
- Round 21 – 27 : Work 1 sc in each stitch around. ( 9 ) switching colors at each new round

3. Crochet the Long Eared Bunny Body
- Round 1: Work 6 sc into a magic circle. (6)
- Round 2: Work 2 sc in each stitch around. (12)
- Round 3: Work *1 sc in next stitch, 2 sc in next stitch* 6 times. (18)
- Round 4: Work *1 sc in each of next 2 stitches, 2 sc in next stitch* rep around . (24)
- Round 5: Work *1 sc in each of next 3 stitches, 2 sc in next stitch* rep around . (30)
- Round 6: Work *1 sc in each of next 4 stitches, 2 sc in next stitch* rep around . (36)
- Round 7 – 9 : Work 1 sc in each stitch around. ( 36 )
- Round 10 : Work *1 sc in each of next 1 6 stitches, sc2tog next 2 stitches* rep around . ( 34 )
- Round 11 : Work *1 sc in each of next 15 stitches, sc2t og next 2 stitches* rep around . (32 )
- Round 12 – 13 : Work 1 sc in each stitch around. ( 32 )
- Round 14: Work *1 sc in each of next 14 stitches, sc2tog next 2 stitches* rep around . ( 30 ) ** Switch colors
- Round 1 5 : Work *1 sc in each of next 13 stitches, sc2tog next 2 stitches* rep around ( 2 8 )
- Round 16 – 17 : Work 1 sc in each stitch around. ( 28 )
- Round 18 : Work *1 sc in each of next 12 stitches, sc2tog next 2 stitches* rep around ( 2 6 )
- Round 1 9 : Work *1 sc in each of next 11 stitches, sc2tog next 2 stitches* rep around . ( 24 )
- Round 2 0 – 21 : Work 1 sc in each stitch around. ( 24 )
- Round 22: Work *1 sc in each of next 10 stitches, sc2tog next 2 stitches* rep around . ( 22 )
- Round 23 : Work *1 sc in each of next 9 stitches, sc2tog next 2 stitches* rep around . ( 20 )
- Round 24 – 25 : Work 1 sc in each stitch around. ( 20 )
- Round 26: Work *1 sc in each of next 8 stitches, sc2tog next 2 stitches* rep around . ( 18 )
Stuff and sew to the head


4. Crochet the Long Eared Bunny Legs (X2)
- Round 1: Work 6 sc into a magic circle. (6)
- Round 2: Work 2 sc in each stitch around. (12)
- Round 3: Work *1 sc in next stitch, 2 sc in next stitch* 6 times. (18)
- Round 4: Work *1 sc in each of next 2 stitches, 2 sc in next stitch* rep around . (24)
- Round 5 : Work 1 sc in each stitch around. ( 24 )
- Round 6 : Work *1 sc in each of next 11 stitches, 2 sc in next stitch* rep around . ( 26 )
- Round 7 – 9 : Work 1 sc in each stitch around. ( 26 )
- Round 10 : Work *1 sc in each of next 11 stitches, sc2tog next 2 stitches* rep around . ( 24 )
- Round 1 1 : Work *1 sc in each of next 10 stitches, sc2tog next 2 stitches* rep around . ( 22 )
- Round 1 2 : Work *1 sc in each of next 9 stitches, sc2t og next 2 stitches* rep around . ( 20 )
- Round 13 : Work 1 sc in each stitch around. ( 20 )
- Round 14: Work *1 sc in each of next 8 stitches, sc2tog next 2 stitches* rep around . ( 18 )
- Round 1 5 : Work 1 sc in each stitch around. ( 18 )
- Round 1 6 : Work *1 sc in each of next 7 stitches, sc2tog next 2 stitches* rep around ( 16 )
- Round 17: Work 1 sc in each stitch around. ( 16 )
- Round 18 : Work *1 sc in each of next 6 stitches, sc2tog next 2 stitches* rep around . ( 1 4 )
- Round 19: Work 1 sc in each stitch around. ( 14 )
- Round 20 : Work *1 sc in each of next 5 stitches, sc2tog next 2 stitches* rep around . ( 12 )
- Round 21: Work 1 sc in each stitch around. ( 12 )
- Round 2 2 : Work *1 sc in each of next 4 stitches, sc2tog next 2 stitches* rep around . ( 10 )
- Round 23: 2 sc in next 3 stitch es , sc2tog next 6 stitches , 1 sc in last stitch (10)
- Round 24 – 37 : Work 1 sc in each stitch around. ( 1 0 )

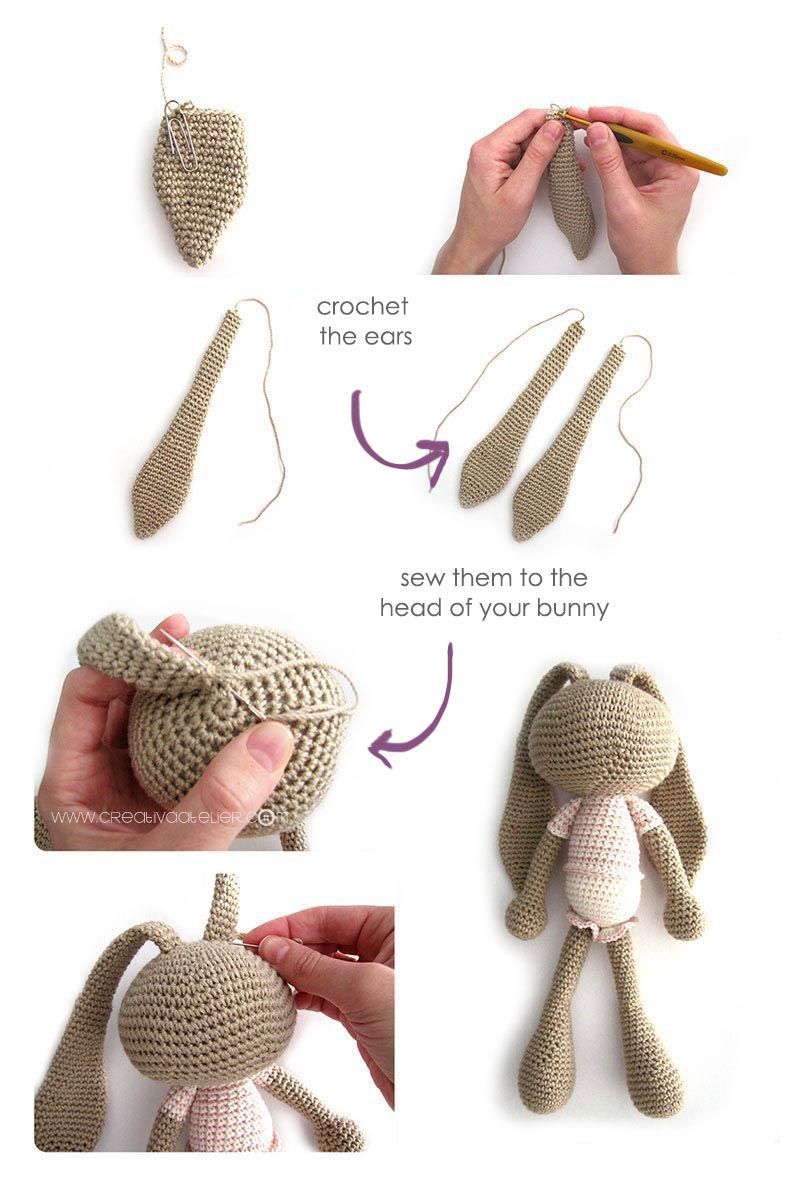
6. Crochet the Long Eared Bunny Ears (X2)
- Round 1: Work 5 sc into a magic circle. (5)
- Round 2: Work 1 sc in each stitch aro und. (5)
- Round 3: : Work 2 sc in each stitch around. (10)
- Round 4 – 5: Work 1 sc in each stitch around. (10)
- Round 6: Work *1 sc in next stitch, 2 sc in next stitch* 6 times. (15)
- Round 7 – 8: Work 1 sc in each stitch around. (15)
- Round 9: Work *1 sc in next stitch, 2 sc in next stitch* 6 times. (22)
- Round 10 – 14: Work 1 sc in each stitch around. (22)
- Round 15: Work *1 sc in each of next 9 stitches, sc2tog next 2 stitches* rep around. (20)
- Round 16 – 17: Work 1 sc in each stitch around . (20)
- Round 18: Work *1 sc in each of next 8 stitches, sc2tog next 2 stitches* rep around. (18)
- Round 19: Work 1 sc in each stitch around. (18)
- Round 20: Work *1 sc in each of next 7 stitches, sc2tog next 2 stitches* rep around (16)
- Round 21 – 23: Work 1 sc in each stitch around. (16)
- Round 24: Work *1 sc in each of next 6 stitches, sc2tog next 2 stitches* rep around (14)
- Round 25 – 27: Work 1 sc in each stitch around. (14)
- Round 28: Work *1 sc in each of next 5 stitches, sc2tog next 2 stitches* rep around. (1 2)
- Round 29 – 31: Work 1 sc in each stitch around. (12)
- Round 32: Work *1 sc in each of next 4 stitches, sc2tog next 2 stitches* rep around. (10)
- Round 33 – 42: Work 1 sc in each stitch around. (10)
- Round 43: Work *1 sc in each of next 3 stitches, sc2tog next 2 stitches* rep around. (8)
7. Crochet the Long Eared Bunny Tail
- Round 1: Work 6 sc into a magic circle. (6)
- Round 2: Work 2 sc in each stitch around. (12)
- Round 3: Work 1 sc in each stitch around. ( 12 )
- Round 4 : Work *1 sc in each of next 2 stitches, sc2tog next 2 stitches* rep around . ( 9 )
Stuff and sew to the body

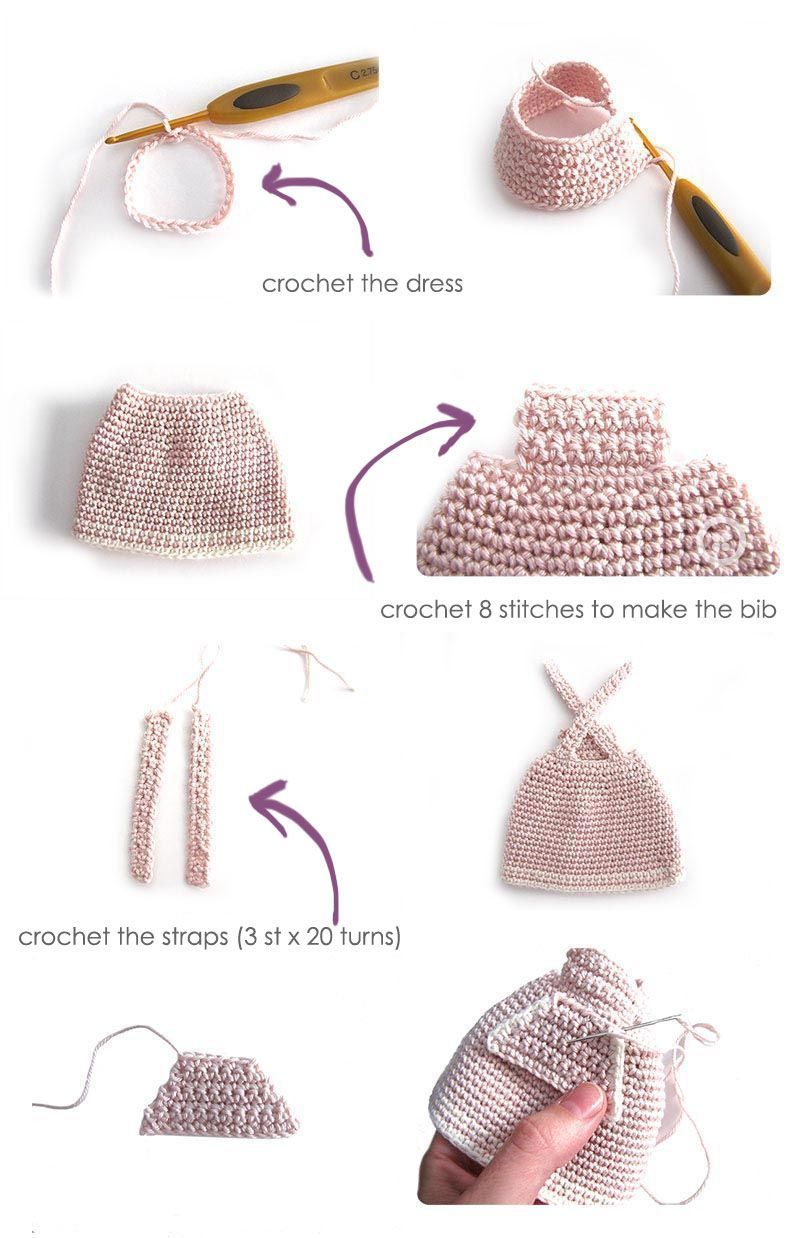
8. Crochet the Long Eared Bunny Dress
- Round 1: Chain 30 and close with a slip stitch
- Round 2: Work 1 sc in each stitch around. ( 30 )
- Round 3 : Work *1 sc in each of next 4 stitches, 2 sc in next stitch* rep around . ( 36 )
- Round 4: Work 1 sc in each stitch around. ( 36 )
- Round 5 : Work *1 sc in each of next 4 stitches, 2 sc in next stitch* rep around . ( 42 )
- Round 6: Work 1 sc in each stitch around. ( 42 )
- Round 7 : Work *1 sc in each of next 4 stitches, 2 sc in next stitch* rep around . ( 52 )
- Round 8 – 15: Work 1 sc in each stitch around. ( 52 )
- Round 16 : Work *1 sc in each of next 25 stitches, 2 sc in next stitch* rep around . ( 54 )
- Round 17 – 20: Work 1 sc in each stitch around. ( 54 ) switching colors at each new round
To make the chest piece single crochet back and forth 8 stiches 8 times .


 And just like that, we have our finished Long Eared Bunny!
If you have enjoyed this free amigurumi pattern and tutorial, please pass our website address along to a friend and do not hesitate to share it or comment below. I love to hear your opinions and I can try to resolve any questions that you may have if you decide to make it.
Kisses!
Tutorial, pattern and images registered under a Creative Commons licence Creative Commons Attribution-NonCommercial-NoDerivatives 4.0 . Peluche de crochet “Conejita de orejas largas” – AMIGURUMI – CC by-nc-nd 4.0 – Marta Porcel
This pattern is for personal use only. Please do not claim this pattern as your own, or sell or distribute it. If you would like to share this pattern, please link to this site and do not repost the pattern on your site. You can sell finished items made from this pattern, but please link back and give credit to Creativa Atelier. Please, respect designers and their Intellectual Property. Thanks!
![Knitted Baby Shoes - DIY Garter Stitch Ballerinas [ EASY Pattern & Tutorial ]](https://www.creativaatelier.com/wp-content/uploads/2017/12/knitted-baby-shoes-ballerinas-easy-pattern-0.jpg) Knitted Baby Shoes – Ballerinas Easy Pattern & Tutorial
Knitted Baby Shoes – Ballerinas Easy Pattern & Tutorial![Garter Stitch Baby Sweater - [ EASY Pattern & Tutorial ]](https://www.creativaatelier.com/wp-content/uploads/2018/01/Garter-Stitch-Baby-Sweater-0.jpg)
I have made these before, so cute and everyone lives them.
Had printed off a pattern that was only a few pages ling, but i misplaced it
So happy i could still find it online!!
Is there a pattern to crochet pants for the bunny instead of the dress?
Just want to say I loved this bunny. I had to alter it slightiy so the body had no clothes. My daughter gave birth to a boy on 8th November so I made shorts and jacket instead of the dress. Its not perfect but I loved it when I finished it. Thank you for the pattern and great picture instructions.
Love this pattern!! Making my second bunny for grandkids. Thanks so much for sharing the pattern!
Did your pattern have directions for making the rabbit body? Mine is missing the body directions.
Thank you for sharing the pattern. I am enjoying making this but there does not seem to be a part 5,.is that correct? It doesn’t seem to give instructions for the frilly at the top of the legs.
Thanks, Jackie
I was also trying to figure that out. Those frills seem to be worked in single crochet stitches after the body is completed
Hi, I haven’t reached to the frilly part yet but I think you can try but crocheting 2 single crochet in one stitch the whole round after changing the colour of the yarn. And continue to do the same another round n you will get the frills
That is what I did and it turned out ok. Even if you don’t do the frilly part, the dress hides that part of the legs
Je to moc pěkné