


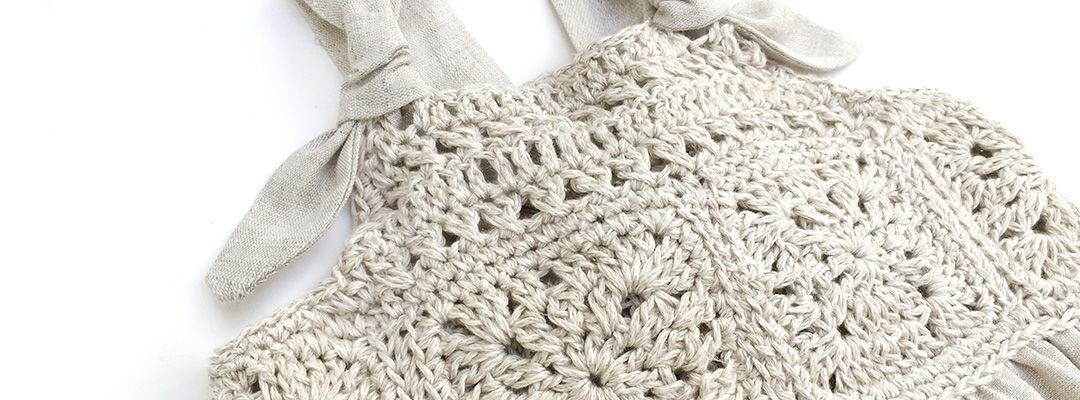
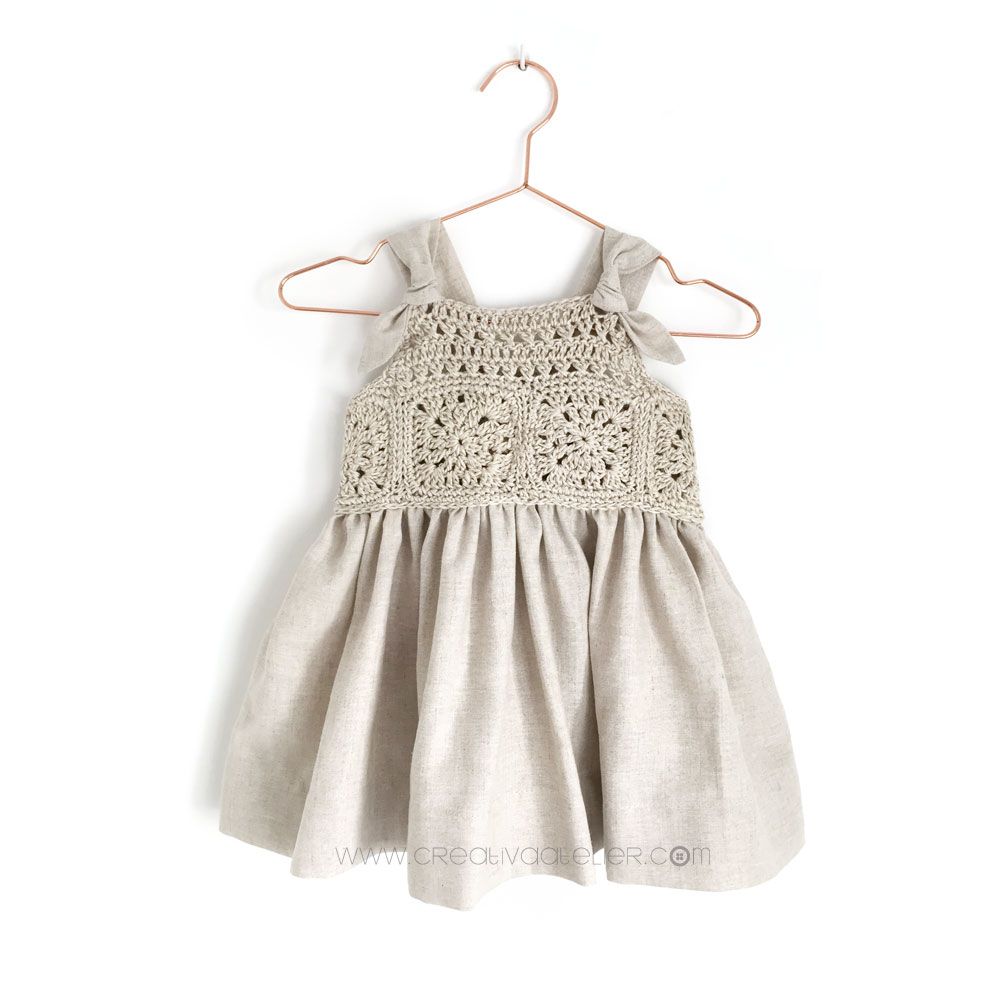
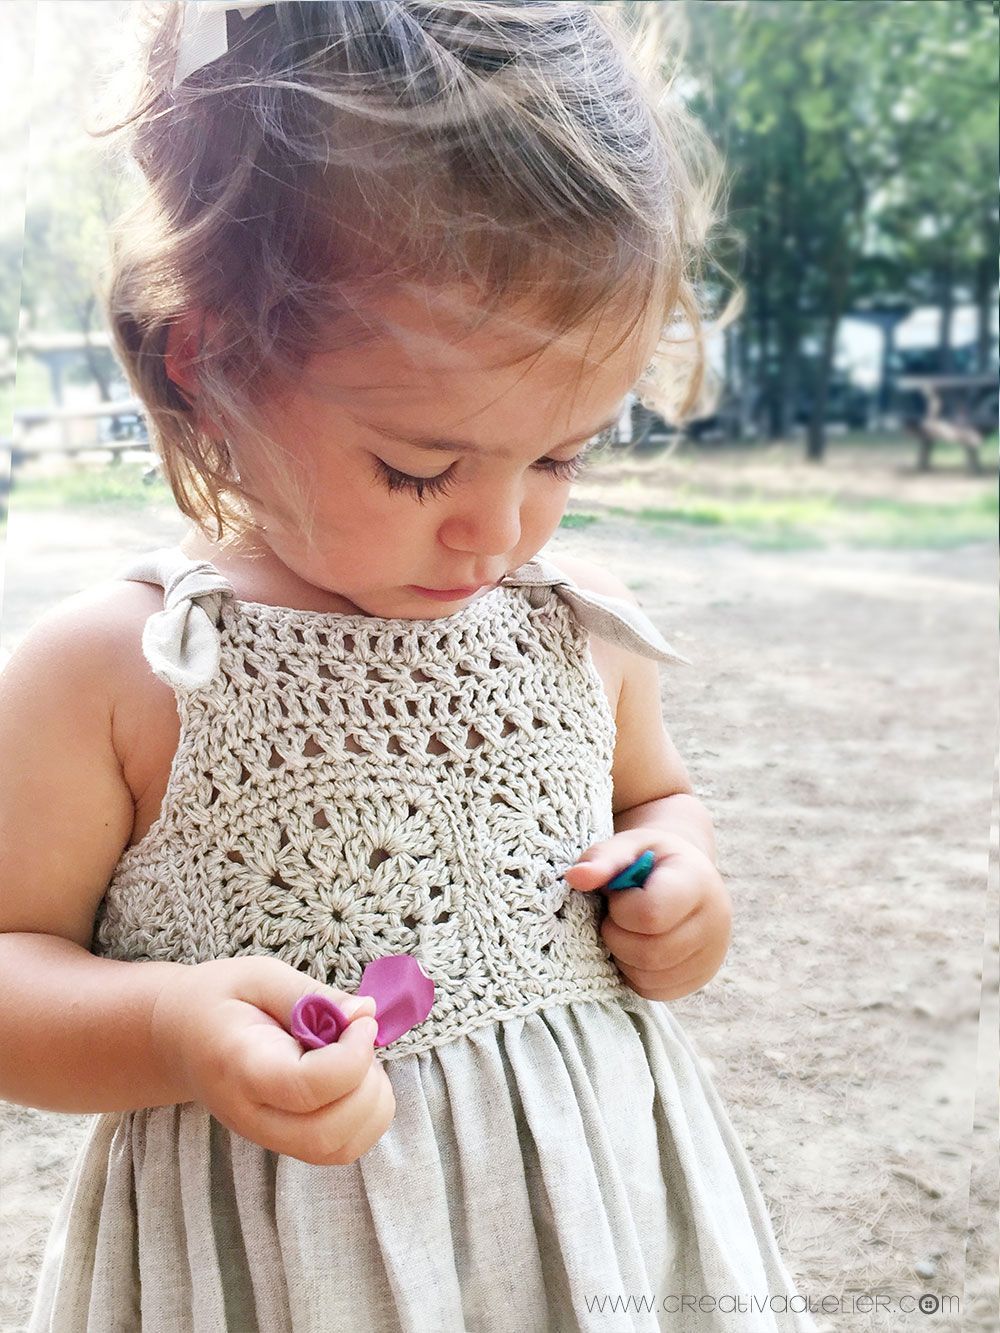
Summer is coming and it is time to prepare the closet and crochet a Fabric and Granny Squares Dress to enjoy this season. You will need few materials and you can make this dress so quickly that, within a day, you will have it ready. If you are looking for a new project or simply need a little and fast project to crochet by the pool that don’t get you stuck, this is the one!
Materials to crochet a Fabric and Granny Squares Dress
- 1 ball of linen or cotton yarn. I chose Drops Bomull Lin in shade 03 light beige, a natural and rustic yarn made of multiple strands of linen and cotton that combines the structure of the linen with the softness of the cotton
- 3,75 mm (USA F) crochet hook
Tapestry needle
2 wooden buttons - 50 cm. of fabric
- Our usual sewing tools: sewing machine, pins, thread, scissors,
measuring tape, etc…
How to make a Fabric and Granny Squares Dress – Size 18-24 months –
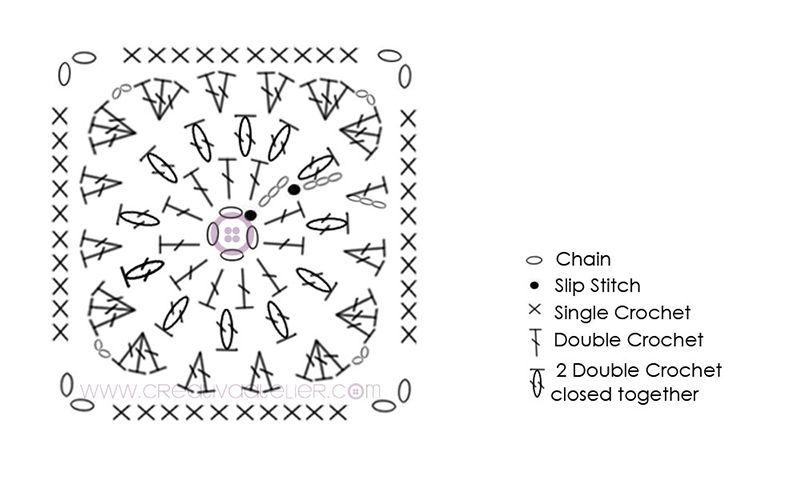
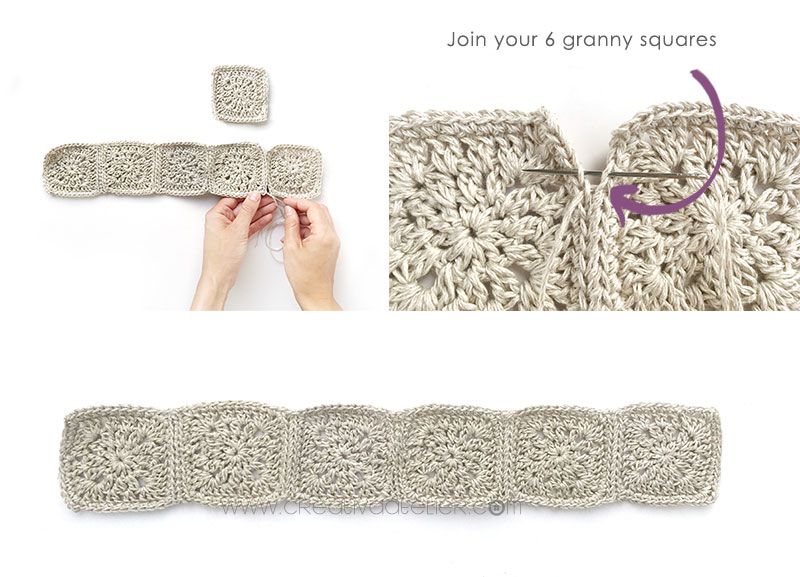
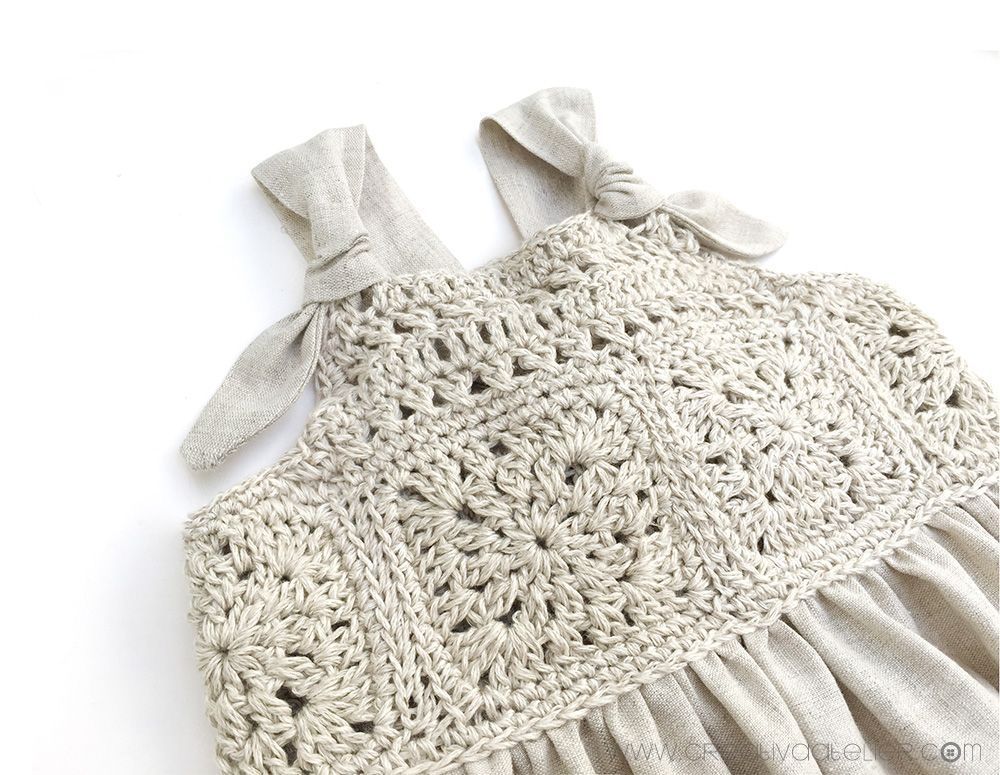
1. Crochet 6 granny squares
Start by crocheting 6 granny squares following the next pattern:
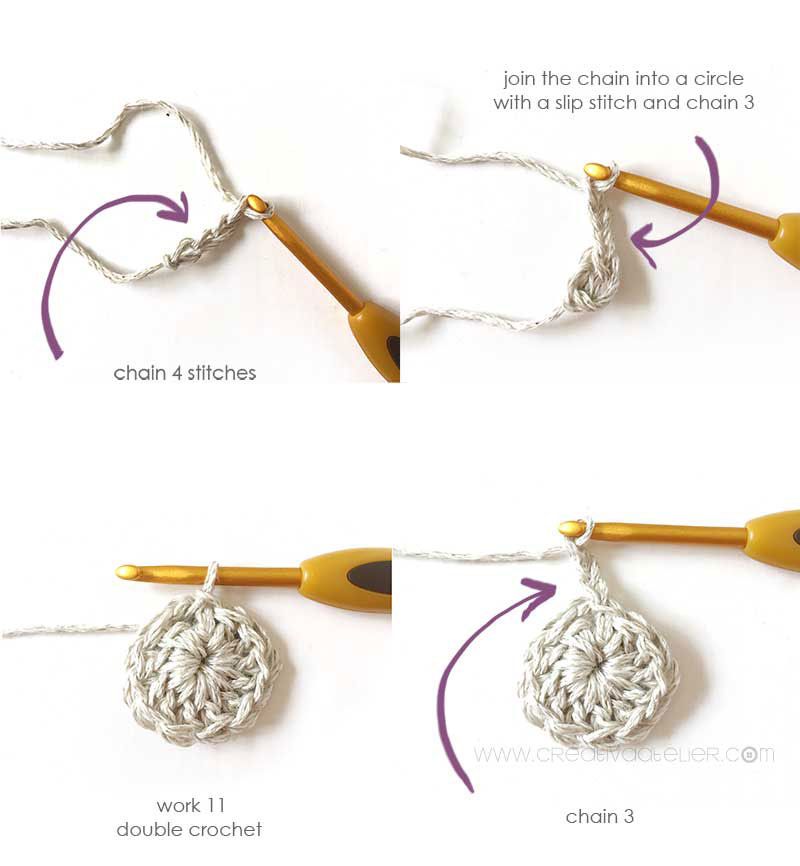
Round 0. Chain 3 stitches and join the beginning and end of the chain with a slip stitch.
Round 1. Chain 3 stitches that will count as the first Double Crochet (dc) and work 11 dc into the center of the ring (you will get 12 dc), slip stitch (sl st) at the end
Round 2. Chain 3 and work 2 dc closed together into each space between stitches from the previous row (you will get 12 groups of 2 dc each), sl st at the end.
Round 3. Chain 3, 1 dc, work 3 dc, chain 2, 3 dc into the same space, 2 dc, 2 dc, 3 dc, chain 2, 3 dc into the same space, 2 dc, 2 dc, 3 dc, chain 2, 3 dc into the same space, 2 dc, 2 dc, 3 dc, chain 2, 3 dc into the same space, 2 dc. sl st at the end.
Round 4. Chain 1, work 1 single crochet (sc) in every stitch and chain 2 each time you reach a corner.
Granny Square measurements
Your granny square should measure approximately 7.5 x 7.5 cm once blocked. If yours ends up smaller, you could always crochet a couple of extra rounds or use a bigger hook. You could use a smaller hook or crochet tighter if it ends up bigger than indicated.

1. Join your Granny Squares
Join together your 6 granny squares by sewing one side of each square as the photo shows.
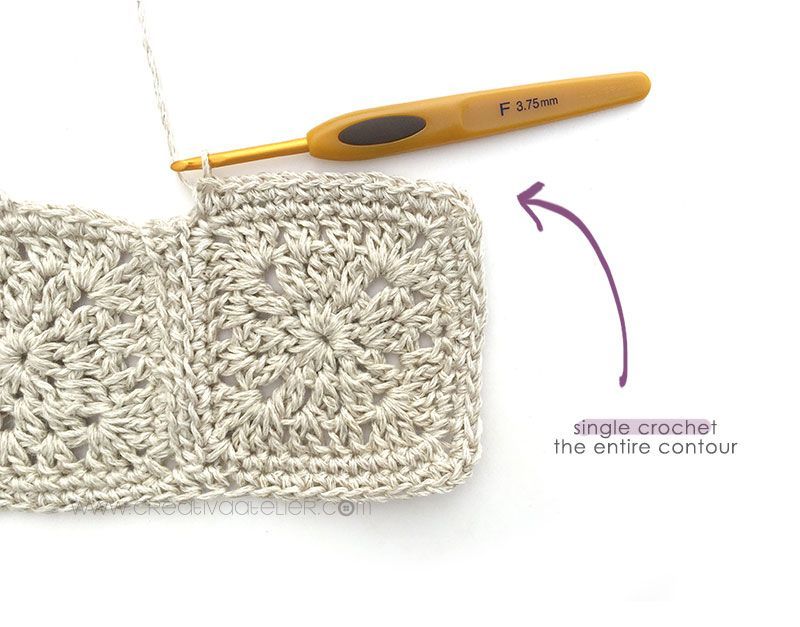
Once the granny squares of the yoke are sewn together, single crochet the entire contour to even it. If you notice a small slit in the joints between the grannys then make it 2 double crochet instead of single crochet and it will be more even.
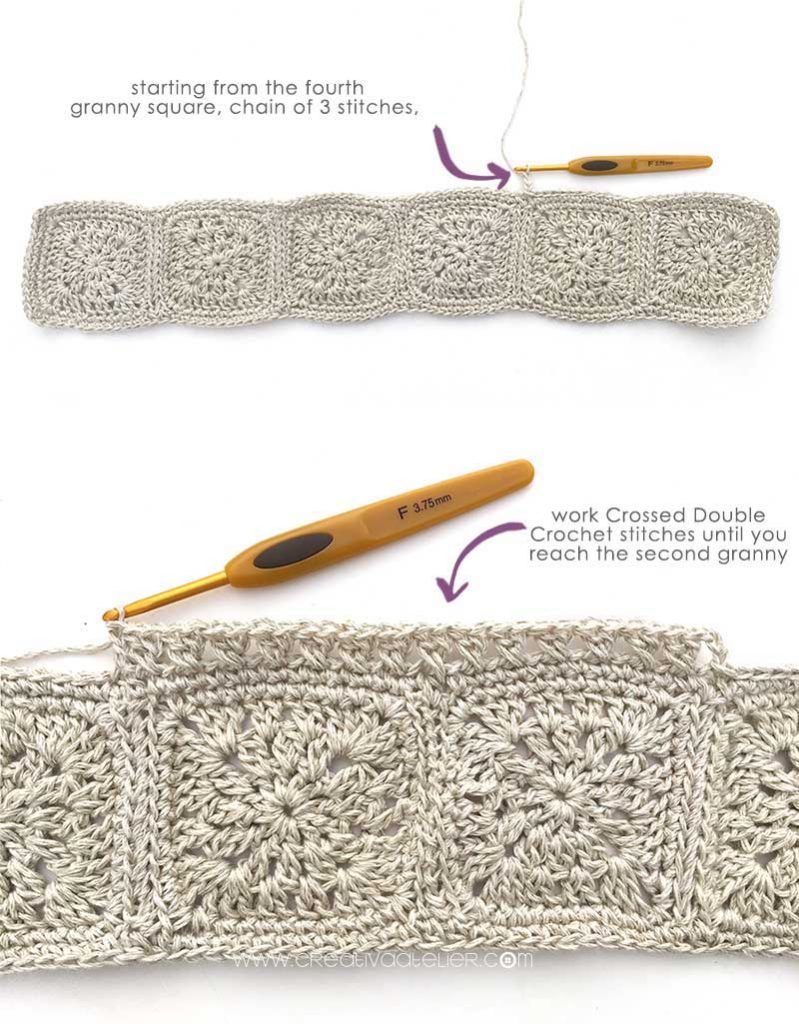
Let’s move on to crochet the bib area of our bodice. To do this, starting from the fourth granny square, chain of 3 stitches, and work Crossed Double Crochet stitches until you reach the second granny.
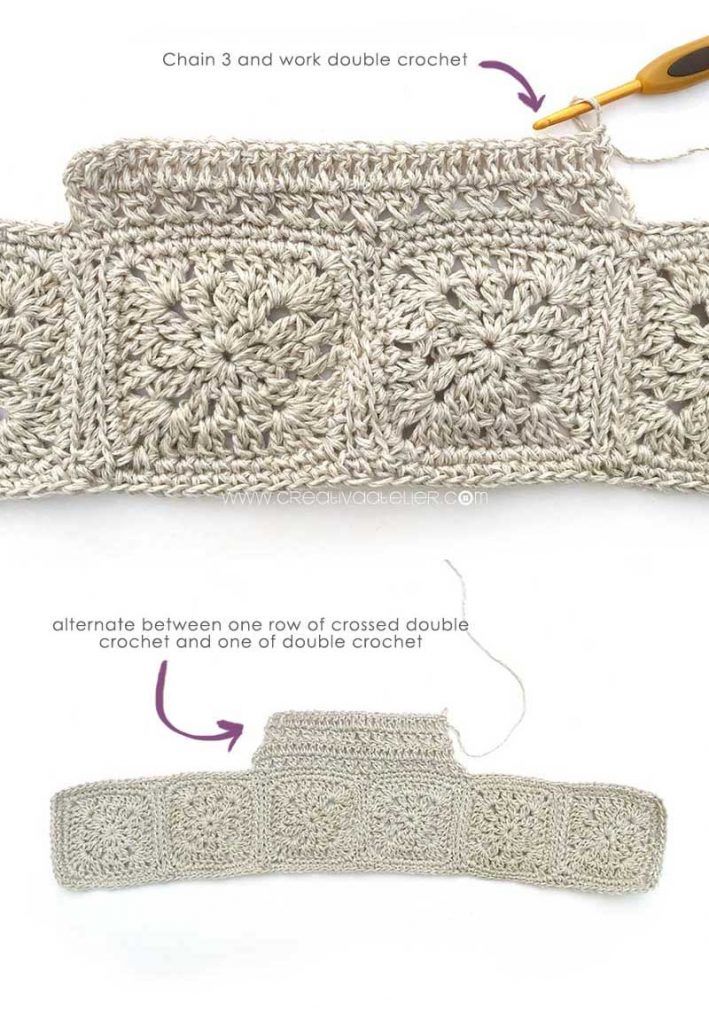
Chain 3 and turn your work. Crochet the entire row in double crochet starting at the second stitch.
Alternate between one row of Crossed Double Crochet stitches and one of double crochet (the bib is composed of 4 rows in total).
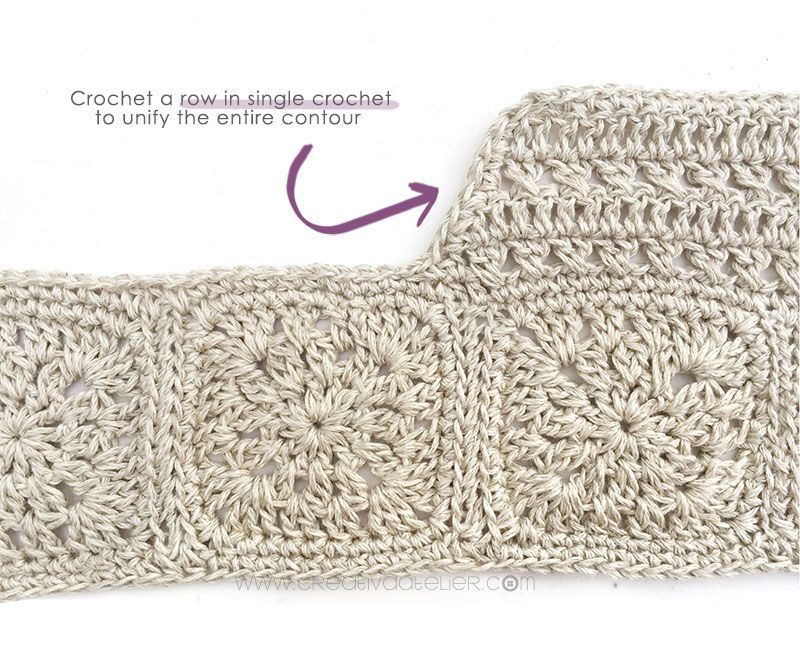
Finish by unifying the entire contour of the bib area by crocheting a row in single crochet.
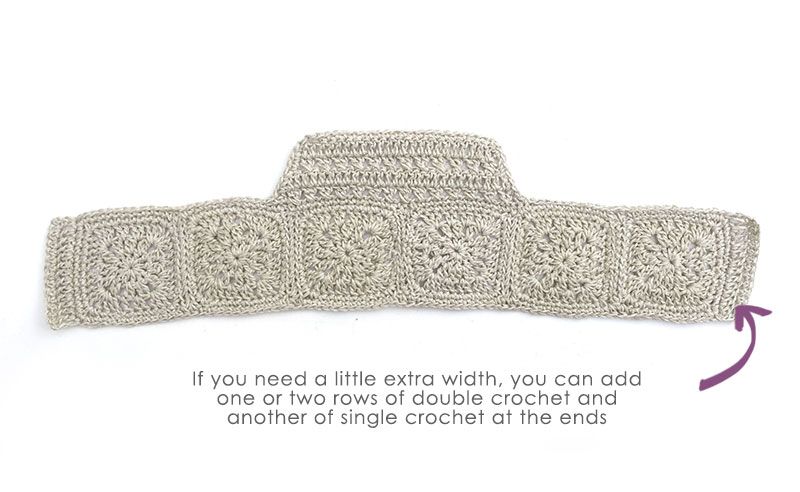
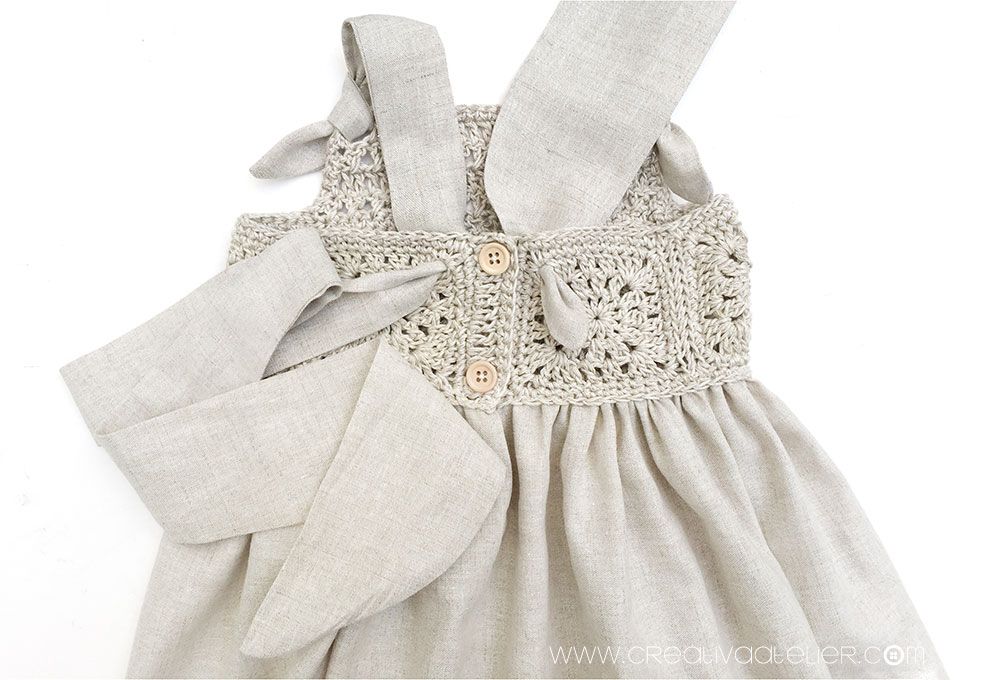
If once you finish crocheting the bodice of the granny squares dress you consider that you need a little extra width, you can add one or two rows of double crochet and another of single crochet at the ends. This will allow you to button up the buttons more easily and give you an extra width.
3. Make the skirt of the Granny Squares Dress
It is time to move on to work the fabric part of our dress. Start by cutting the fabric of the desired size. To calculate the width of the fabric, you must measure the contour of the yoke and double this contour. That is, if the bottom of your bodice measures 50 cm. You must cut the width of the fabric to 100 cm. If you want the skirt to have more flight when curled, try to give it some extra centimeters.
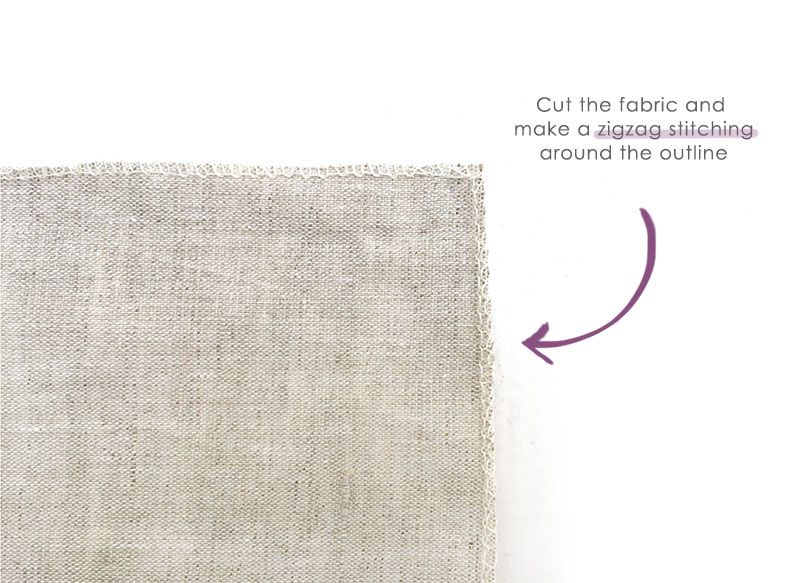
Make a zigzag stitching around the fabric’s outline or use your overlock machine, if you have one, to do this. As I always tell you, although the overlock machine makes the work a bit easier and a cleaner and more professional result, is not essential for this type of work and the dress will be equally beautiful with a zigzag stitch of any conventional sewing machine.

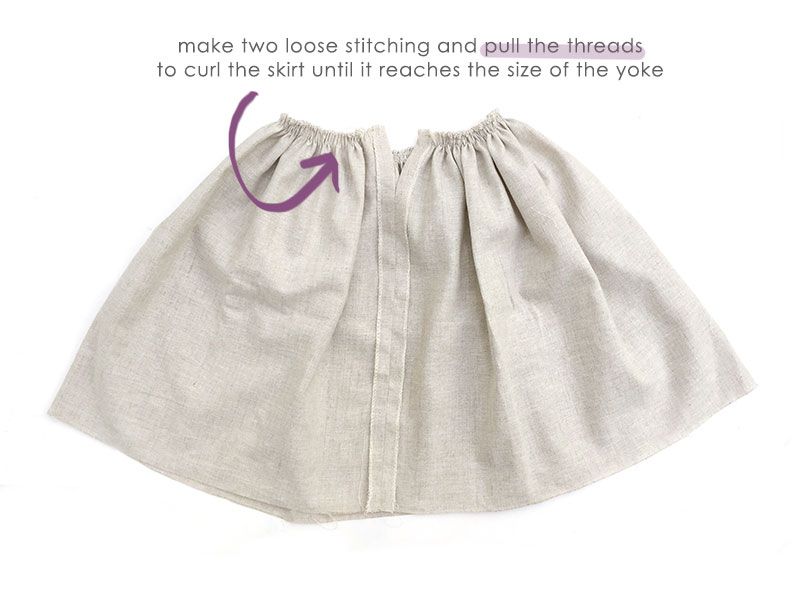
Join the two ends of the fabric leaving about 10 centimeters at the top.
With the tension of the machine to the minimum, make two loose stitching and pull the threads to curl the skirt until it reaches the size of the yoke.
4. Sew the skirt ti the yoke
Attaching the skirt to the yoke of the granny squares dress is easier than it seems, you just have to follow some simple steps.
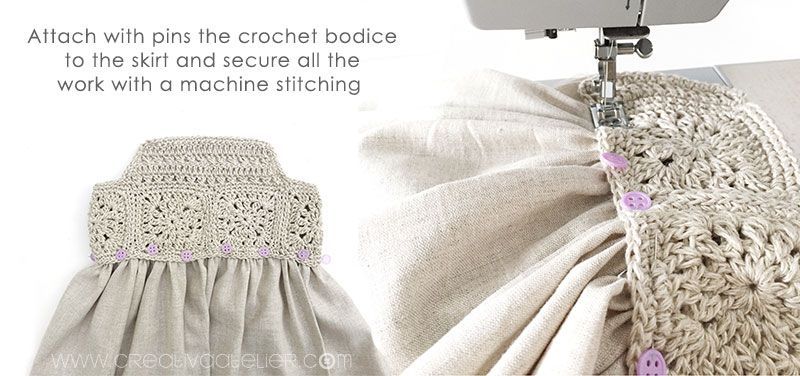

First you must mark the front center of the skirt and the sides (right under the armhole). Once you have marked these three strategic points, start by pinning the ends of the yoke to the skirt, then the center front and, finally the armholes. At this point you will have placed 5 pins. Put some more in between to finish securing all the work and sew them together with a machine stitching.
5. Make and put the straps
Cut two rectangles of 80 cm. long x 7 cm. wide to make the straps. You can make them with a straight or with inclination, so that they are wider in the lacing area and narrower in the strap area.
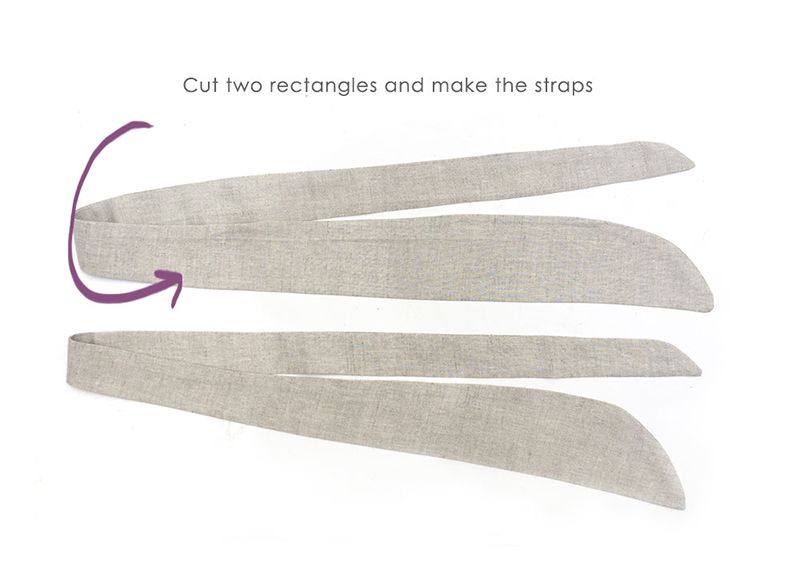
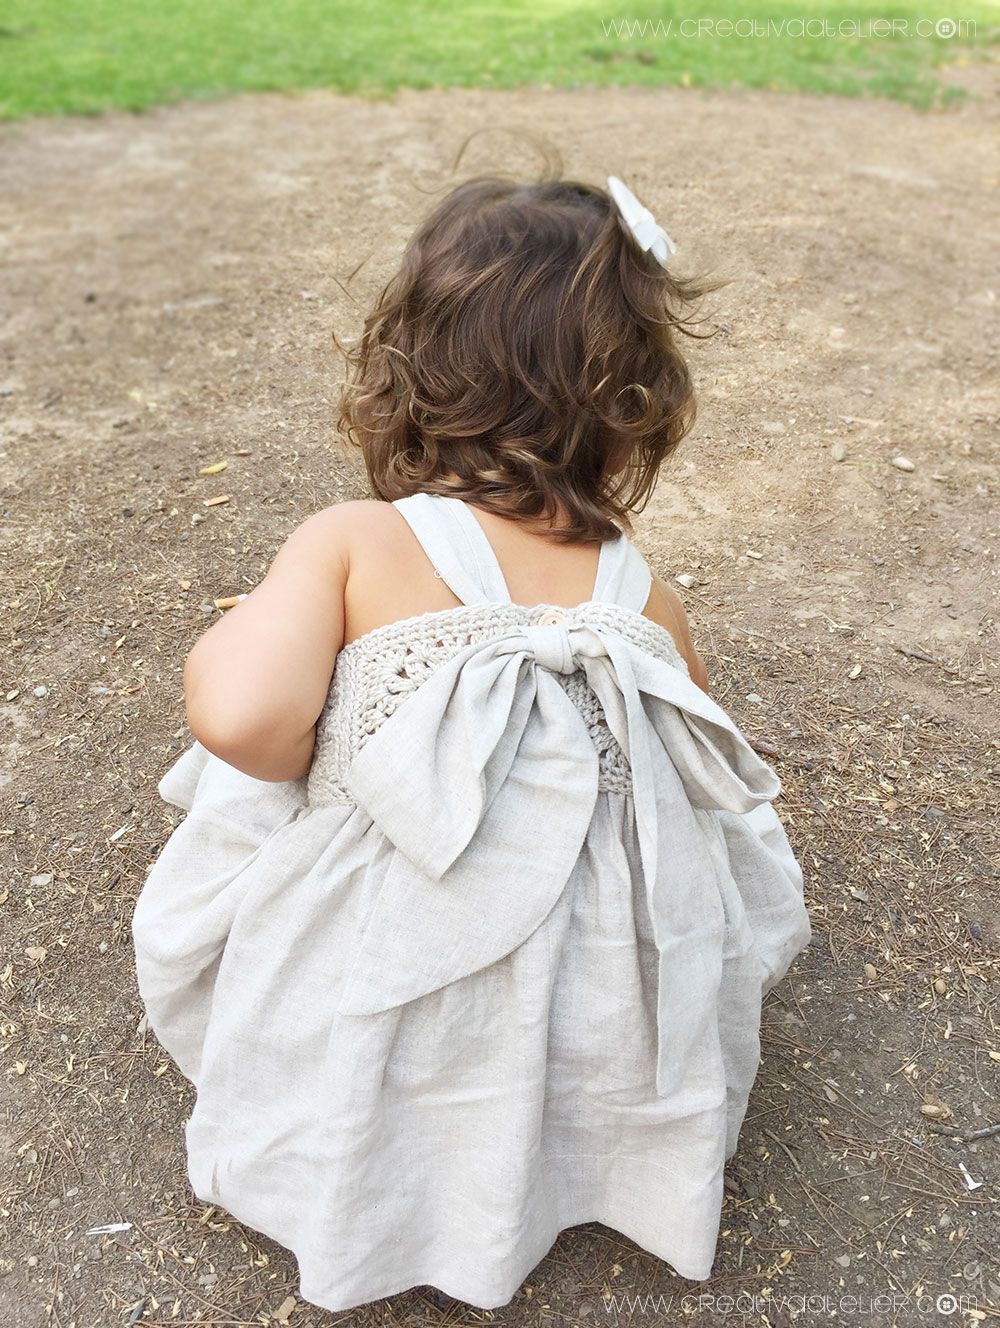
Once the suspenders are made, knot them to the bib area and to the back of the granny squares baby dress as the photos indicate.
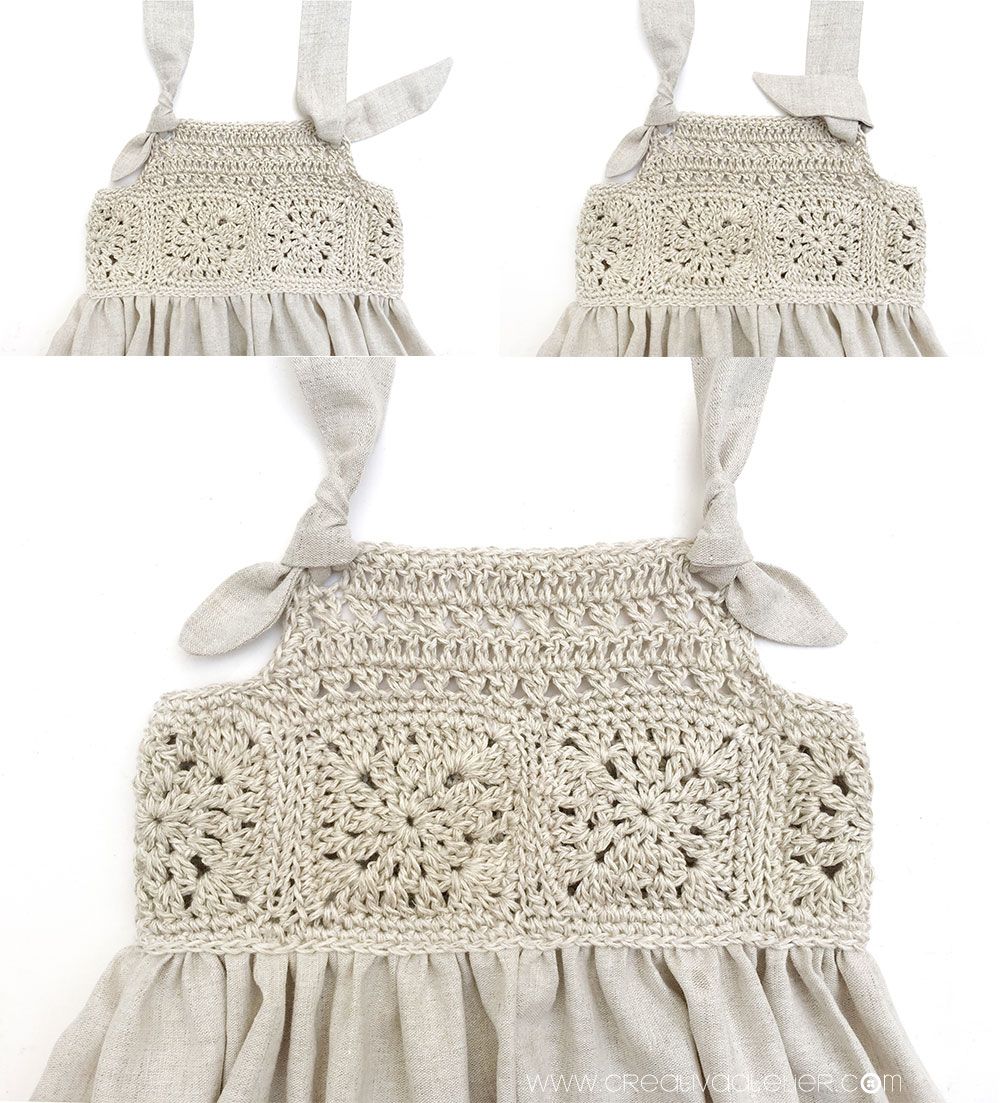
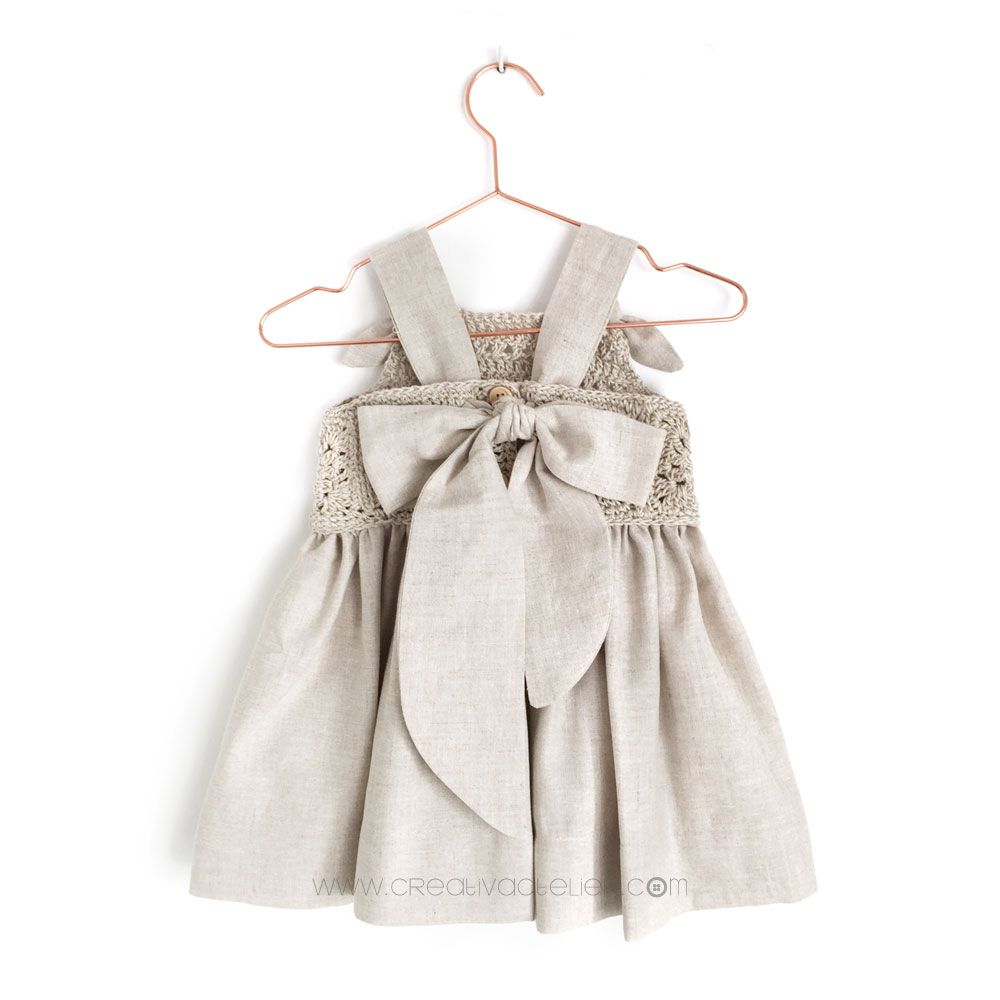
When you have the right size for the straps, make a few stitches at the junction between the strap and the back to secure them in place and that’s it! You already have your granny squares dress ready to wear!


And to complete the set, nothing better than a matching diaper cover.


To be honest, for a long-time granny squares seemed horrible to me, reminding me of grandma blankets and old quilts. But the problem was not the grannys… the problem was that the blankets I remembered were blankets made to reuse wool rests, mostly of low quality, and with impossible combinations of colors.
For me, the secret when using this technique is to conscientiously choose the range of colors and above all, use quality materials, and if they are natural fibers much better! 🤗
And by the look of this dress… what do you think about combining Granny Squares and fabric in a dress?

If you liked this tutorial and it has inspired you, do not forget to share your discovery and comment below! I will love to hear your opinion and I will try to solve any questions you have if you decide to make it.
All the best,

Tutorial, pattern and images registered under a Creative Commons Attribution-NonCommercial-NoDerivatives 4.0. Patrón y Tutorial de Pelele de Crochet Sandía – CC by-nc-nd 4.0 – Marta Porcel This pattern is for personal use only. Please do not claim this pattern as your own, or sell or distribute it. If you would like to share this pattern, please link to this site and do not repost the pattern on your site. You can sell finished items made from this pattern, but please link back and give credit to Creativa Atelier. Please, respect designers and their Intellectual Property. Thanks!
 Crochet Rainbow Romper – Pattern & Tutorial
Hi, I would absolutely love a drawn pattern of your strap ends. I made this dress but my straps didn’t turn out as lovely as yours. The shape was off. Is there anyway you would be willing to share what you do to cut them out so perfectly?
Hi love your work would like to make for a 3/6month old how do I work out the squares xxxx
Love it.
I just finished this dress for my granddaughter and it turned out great. I really love this pattern!
Hello, I just finished this for my granddaughter using your pattern. Thank you so much!!!!
Hello ! I’d like to know what is the length of the fabric because you only give the width
The length of the dress is something that will depend on the height of the person you are making it for, as well as your own personal preference. To be safe, I suggest giving it extra length; if need be, you can always take up the hem at a later time.😉
Hi is this pattern in English or American crochet? Thankyou
American crochet terms 😉
Hi Judy! Your granny square should measure approximately 7.5 x 7.5 cm once blocked.
I love this dress and going to try and make it.
I am wondering if you could tell me how many stitches I should end up with in the last 2 rows (6&7)
Thank you Marta
Grazie mille! Bellissimo tutorial.
Beautiful design! Fabric – Flax?
I’m planning to make this beautiful little dress for my granddaughter. I like it that you explain every step of making and crocheting this dress. Thank you SO much
Anita
I’m thinking for those requesting a smaller size or a bigger size…maybe use a smaller crochet hook and less fabric? Or a bigger hook with thicker yarn and more fabric for the skirt? I had a little giggle at the description of the “old granny squares” in the “impossible combination” of colors….my Gramma crocheted my cousins and I some granny square vests in red, white & blue. It was the early 70’s. Even so they’d be dated for sure, I miss my Gramma and wish I still had mine❤️
Precioso el vestido me ha encantado muy fácil y bien explicado muchas gracias
Bonjour,
J’aime beaucoup ce modèle. Cela fait plusieurs jours je cherche à réaliser ce type de robe 👗 mixte, tricot et tissu, avec des explications en français surtout. Pouvez-vous me donner les bonnes dimensions pour un taille 9/12 mois ou 12 mois uniquement ? Vous pouvez me joindre par mail : martineribault@yahoo.fr
Vous remerciant par avance de votre aide éventuelle.
Cordialement
Martine RIBAULT
This is the cutest dress ever. I will make it for my grand daughter. Thank you so much for the detailed explanation. 🥰 Angela.
Beautiful pattern. May I ask what kind of fabric you used
Thank you very much Linda! I am glad you like it! 🤗 I used linen.
Hi love the pattern but I’m having trouble understanding row #6 of the granny square Do you have a video of that at all
Thanks Chris
Its a beautiful dress. Lovely
In fact I wanted to join but due to language barrier I couldn’t understand the “I am not robot” markings. So it didn’t work.
I absolutely adore this pattern. Do you sell an ad-free pdf of it?
I love this so much. Will you be selling a pattern for any bigger sizes?
Très beau travail, deux petites filles une de 2 ans et une de 6 ans,serait il possible de trouver le modèle dans la plus grande taille.
Merci pour votre réponse
Annie
Bonjour,
Je suis vraiment fan de ce modèle, il est magnifique 😍
Je baptise mes filles en juin, elles auront 7 mois et j’aimerai beaucoup leur mettre cette robe . Auriez vous les dimensions pour un modèle de 9 mois ?
Merci
Cordialement
Merci beaucoup pour votre intérêt pour ce modèle, et je suis ravie d’apprendre que vous êtes fan ! 😍
Ce modèle particulier est uniquement disponible dans la taille fournie dans le tutoriel gratuit. Malheureusement, je n’ai pas de dimensions spécifiques pour une taille de 9 mois.
Cordialement, Marta
This is beautiful!! Do you have it sized for a 6-9m or a 4T?
thanks for your pattern. Love it 😍
Beautiful!
É realmente lindo, vou ver se consigo fazer um igual para minha netinha. Obrigada.
I really love this dress lovely☺️