


Hello Maker! Although it is more than likely that if you know how to knit with two needles you have also shown interest in crochet, and the other way around, you surely feel more comfortable with one or the other when choosing your projects.
In many occasions, when I publish knitting pattern some of you ask me for its crochet version and vice versa, so, I recently proposed myself to re-make all my patterns (whether knitting or crochet) so that you would have them available whatever way you prefer. This is how today it is time to make the “Watermelon Crochet Romper“, which, as you can see, we already knitted a couple of seasons ago. (click here to see the tutorial of the Knitted Watermelon Romper).
Materials for crocheting the Watermelon Crochet Romper
The materials that I have used to make this Watermelon Crochet romper, are the same ones that I used to knit the two-needle version, but you can easily replace them with any yarn indicated for 3 mm needles.
If you decide to use a different yarn, you should only consider the measurements of the tension sample. In this case, the gauge is 20 stitches x 16 rows (10x10cm.).

The quantities and colors that I have used to make our watermelon romper are:
- 1 ball of wool of 50 gr. Rico Design Essentials Cotton DK color 68 Azalea
- 1 ball of wool of 50 gr. Rico Design Essentials Cotton DK color 08 White
- 1 ball of wool of 50 gr. Rico Design Essentials Cotton DK color 45 Emerald
You will also need:
- 2.75 mm crochet hook (USA C)
- 4 stitch markers
- Tapestry needle
- 4 snap buttons
Gauge
10 x 10 cm = 20 sts x 16 rows in Half Double Crochet
Stitches and techniques to make a Watermelon Crochet Romper
- Chain stitch
- Single Crochet
- Front post single crochet
- Front post single crochet
- Increase. Crochet 2 stitches into the same stitch
- Decrease. Either skipping one stitch o crocheting 2 stitches in one.
Abbreviations
st / sts: stitch/ stitches
hdc: Half Double Crochet
sc: Single Crochet
ch: Chain
FPsc: Front post single crochet
hdc.triple inc.: Work 3 hdc into the same stitch
hdc. inc: Work 2 hdc into the same stitch
You will find all the instructions to crochet this Watermelon Romper in size 1-3 months detailed in the texts and images, but if you prefer to download the PDF pattern to have the instructions row by row and stitch by stitch and print it to be able to make annotations or simply consult it without depending on the mobile or the internet connection, you can click on the following button!
I want tell you that, besides the 1-3 months size that I show in the tutorial, this pattern of Baby Crochet Romper is available in size Newborn, 3-6 months, 6-12 months and 12-24 months in PDF format downloadable and printable with detailed instructions row by row, so that you have a perfect watermelon romper! 🍉
All downloadable and printable patterns in all 5 sizes that I mention, you can find them here or by clicking on the following button.
As always, you also have the option of getting the 5 sizes of the pattern together with a great discount by clicking here.
🍉How to make the Watermelon Crochet Romper 🍉
1. Crochet the yoke of the romper
Start by chaining 56 stitches. From the third chain from the hook, crochet 54 half double crochet (hereinafter hdc).

Turn your work and in the next row chain 1, 1 sc, 52 FPsc (Front post single crochet) and 1 dc. You can see how to crochet the Front post single crochet in pictures in this other tutorial on how to make a Crochet Rainbow Romper.
From here we will start working with stitch markers to know at all times where we have to make the increases. Each time the pattern asks you to do a triple increase you must crochet 3 hdc into the same stitch and place the marker at the center stitch of these three.
Chain 2 , 9 hdc, hdc.triple inc, 7 hdc, hdc.triple inc, 18 hdc, hdc.triple inc, 7 hdc, hdc.triple inc, 9 hdc (62 stitches)
Da la vuelta a a labor y teje2 cad. 10 mpa, aum. triple mpa, 9 mpa, aum. triple mpa 20 mpa, aum. triple mpa, 9 mpa, aum. triple mpa, 10 mpa (70 pts)
Turn your work and chain 2, 10 hdc, hdc.triple inc, 9 hdc, hdc.triple inc, 20 hdc, hdc.triple inc, 9 hdc, hdc.triple inc,, 10 hdc (70 stitches)

Continue making the Half Double Crochet triple increases into the markers at each row until you have a total of 102 stitches.

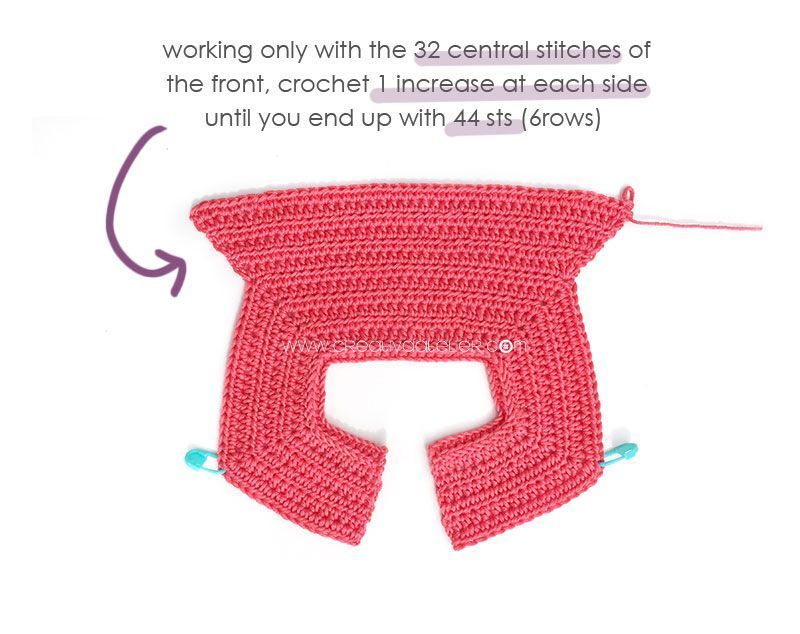
2. Crochet the first part of the front
Once crocheted the yoke of your Watermelon Crochet Romper, work only the 32 central stitches of the front part (from stitch marker to stitch marker).
You must crochet an increase on each side in each row as follows:
Chain 2 and work 2 hdc into the stitch marker stitch. 30 hdc, 1 hdc. inc (34 sts), turn your work and chain 2, 1 hdc. inc, 32 hdc, 1 hdc. inc (36 sts), turn your work and chain 2, 1 hdc. inc, 34 hdc, 1 1 hdc. inc (38 sts).
Continue this sequence of increases until you get 44 stitches in the front.
If you find it easier, remember that you can get the downloadable and printable PDF pattern in size 1-3 months for only € 1.99. In it you will find all these detailed instructions row by row, so you do not miss a stitch! Click the following link to get it.
3. Crochet the first part of the back
Once crocheted the increases of the front, we will crochet the back in the same way, only that this time, you will have to join the two parts of the back.

4. Crochet the body of the romper
From here, we will begin to crochet all the stitches, both front and back, in the round to form the body of the romper. Workt 88 hdc stitches in the round 11 rows.
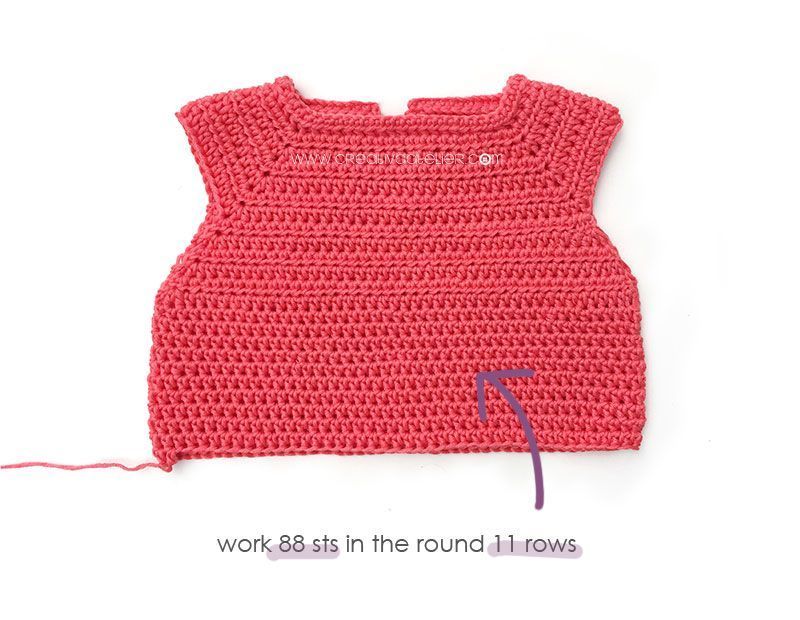
Consider that as we change the way we crochet (we have gone from flat crochet to crochet in the round) the stitches will look a little different in one area compared to the other. In this case, I personally do not care if there is a variation in the stitches, but if it is a problem for you or you do not like the effect, you can continue crocheting your crochet romper flat.
To do this, instead of crocheting 88 stitches in the round, you must first crochet the 44 stitches of the front and the area of the diaper cover (as indicated below) and then go to crochet the back of the romper.
Once you crochet the 11 rows, change color to white and crochet 1 hdc row and 1 FPsc row.

Change color to green and work 8 hdc rows.

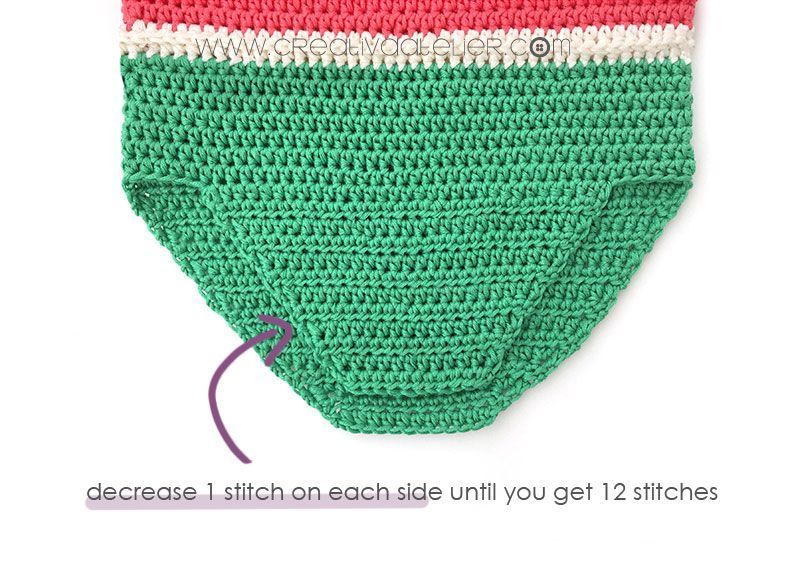
5. Shape the rear diaper cover
From here, we will begin to crochet flat again to form the diaper cover area of the Watermelon Crochet Romper.
Crochet 44 stitches of the back by decreasing 1 stitch on each side as follows: chain 2, dec, 40 hdc, dec. (42 sts), turn your work and chain 2, dec, 38 hdc, dec. (40 sts), turn your work and chain 2, dec, 36 hdc, dec. (38 sts). Continue this sequence of decreases until you end up with 24 stitches.
From now on, instead of 1 decrease on each side, work 2 decreases on each side until you get 12 stitches.
Work 2 more rows of those 12 stitches

6. Shape the front diaper cover
To form the front of the diaper cover, start by skipping 6 stitches and crocheting only 32 center stitches.
Then, decrease 1 stitch on each side until you get 12 stitches.
Crochet those 12 stitches for 2 more rows.


7. Finish the crotch stitches
With the green colored thread, pick up the stitches of each leg starting from the front diaper cover.
- ch 2, hdc all the sts.
- ch 1. 1 sc, FPsc until only 1 stitch remains, 1 sc
Pick up the number of stitches you need, as this depends on your personal taste and measurements of the baby. The important thing is that you crochet the same amount of stitches on both legs.
Final Touches
Weave in all the loose ends with the help of the tapestry needle and place the snap buttons on the back and on the placket of the diaper cover.

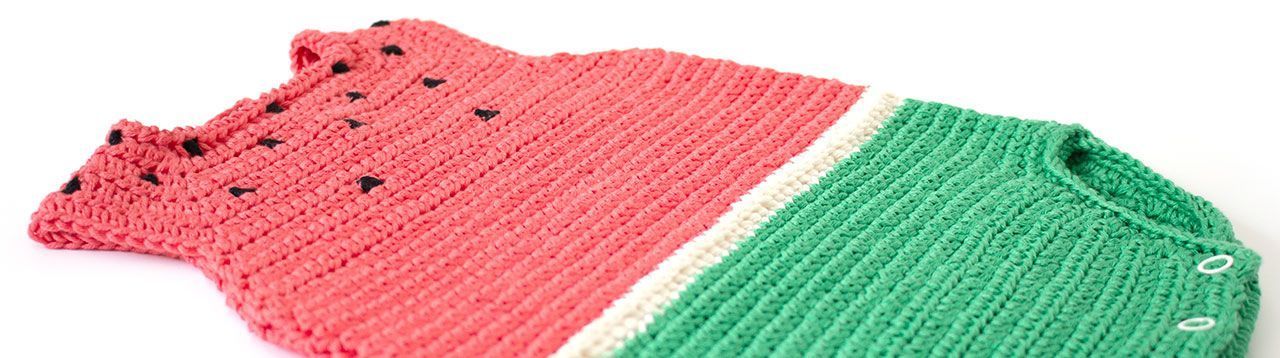
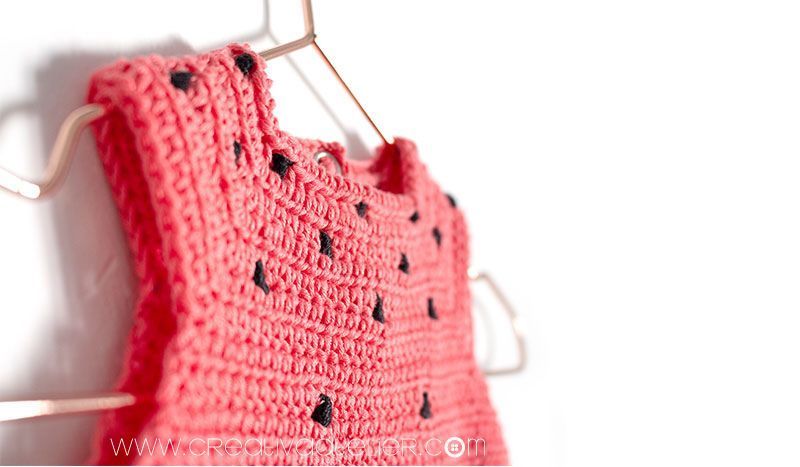
To finish giving your Crochet Romper its watermelon look, use a black thread to embroiders little seeds on the yoke.

And here is the result! A easy crochet romper that will draw everyone’s attention.


As I mentioned earlier, this Watermelon Crochet Romper Pattern is a version of the Knitted Watermelon Romper that I published a couples of years ago. In the pictures below, you can see both rompers together and appreciate their similarities and differences.


As you can see, the crochet stitches have more prominence and texture and the fabric is somewhat thicker. For this reason, it will also need a little more yarn to obtain the same measurements.
Be that as it may, I love the two versions! and personally I do not know which of the two I’m staying with. And you? Everything is a matter of taste!
And remember, if you liked this tutorial and it has inspired you, comment and share your discovery! And of course, once you have finished your Watermelon Crochet Romper, do not forget to brag about the result in social networks with the hashtag #watermelonromper and #creativaatelier.
Kisses!

Tutorial, pattern and images registered under a Creative Commons Attribution-NonCommercial-NoDerivatives 4.0 Tutorial de Pelele de Crochet Sandía – CC by-nc-nd 4.0 – Marta Porcel . This pattern is for personal use only. Please do not claim this pattern as your own, or sell or distribute it. If you would like to share this pattern, please link to this site and do not repost the pattern on your site. You can sell finished items made from this pattern, but please link back and give credit to Creativa Atelier. Please, respect designers and their Intellectual Property. Thanks!
 Fabric and Granny Squares Dress – Pattern & Tutorial
Should I fasten off after I have 102 stitches in part 1? The directions don’t specify but the pictures don’t show where you carried. Not sure what to do??
Hi Natalie,
You should cut your yarn and work only the 32 central stitches of the front part (from stitch marker to stitch marker) as described in the tutorial. If you prefer, you can purchase the detailed PDF pattern, which provides row-by-row and stitch-by-stitch instructions for more precise guidance. Best!
This is adorable but I can’t crochet. How could I convert to knitting, if possible? You have some beautiful designs, am going to start Pink Lady tomorrow!
Hi Suzanne!
I am glad you like it! Fortunately, the knitted version is also available. 😉 You can check the online tutorial here: https://www.creativaatelier.com/knitted-watermelon-romper/?lang=en
The downloadable PDF is available from my online store in sizes Newborn, 1-3 months, 3-6 months, 6-12 months and 12-24 months: https://www.creativaatelier.com/producto/watermelon-romper-pdf-knitting-pattern/?lang=en
All the best!
Marta Porcel
Thank you for this pattern. ive made several of these in different colors for ppl who are having babies this year. perfect gift