


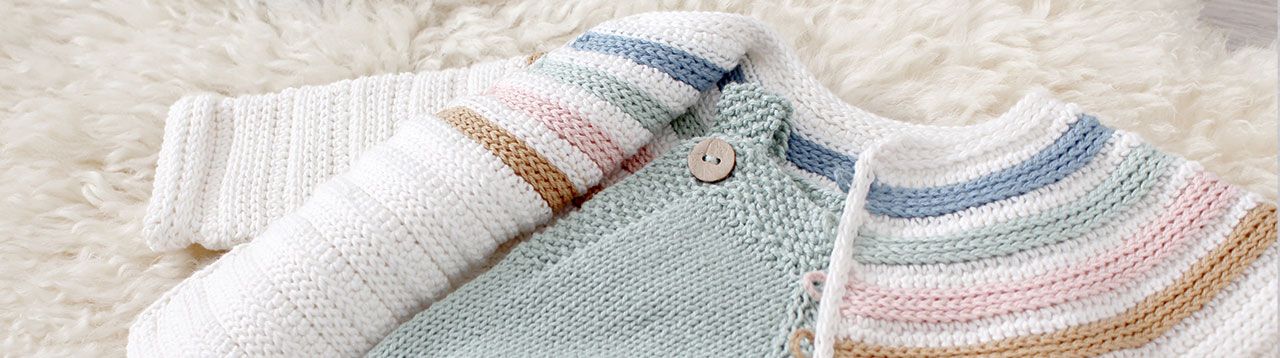
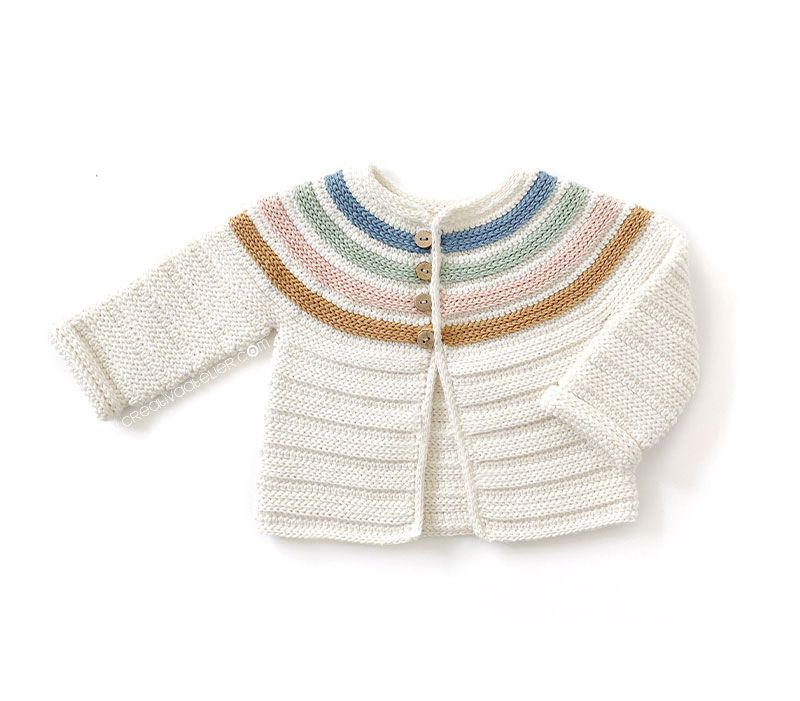
If you follow me on social media (@creativaatelier), you are probably already very familiar with the Ginger Crochet Jacket.
This crocheted baby jacket, together with the Pickles Knitted Romper, forms a part of a lovely collaboration with MEZ Fabra, an international company that includes yarn brands as well known as Anchor, Rowan, Schachenmayr, or Red Heart.

The GINGER Crochet Jacket pattern is available in size 1-3 months, 3-6 months, 6-9 months, 1 year, 2 years, 3 years
If you decide to crochet the Ginger Jacket
Materials
The cotton I have used to crochet this baby jacket is Anchor Baby Pure Cotton. If you cant find it in your local store and you need to find an alternative yarn, keep in mind that your tension sample of 23 stitches x 26 rows (single crochet) should measure 10×10 cm.
- 2 skeins of Anchor Baby Pure Cotton color 105 off-white
- 1 skein of Anchor Baby Pure Cotton color 402 Mint
- 1 skein of Anchor Baby Pure Cotton color 432 Pale Pink
- 1 skein of Anchor Baby Pure Cotton color 179 Mustard
- 1 skein of Anchor Baby Pure Cotton color 421 Blue
You will also need:
- 3mm crochet hook
- Tapestry needle
Stitches and techniques
- Chain Stitch
- Single Crochet
- Single crochet working through Back Loops only
- Decreases
- Slip Stitch
- Slip Stitch working through Back Loops only
Abbreviations
ch: chain
st / sts: Stitch / stitches
sc: Single Crochet
scTBL: work single crochet through Back Loops only
ss: Slip Stitch
ssTBL: work slip stitch through Back Loops only
incTBL: increase crocheting two stitches into the same stitch working through Back Loops only
dec: decrease
How to make the Ginger Crochet Baby Jacket – Size 1-3 months
1. Crochet the yoke of the jacket
Chain 57 stitches. Turn your work and crochet 56 slip stitches.

Crochet 4 rows in slip stitch working only with the back loops.
From the 6th row, we’ll start to work the increases to give shape to the yoke of the crochet baby jacket.
Row 6. ch 1, *1 scTBL, incTBL* rep. from *a* to end of row, 2 scTBL
Row 7. ch 1, sc to end of row
Row 8. Change color to Blue. ch 1, 83 ss.
Rows 9-13. ch 1, ssTBL to end of row. Cut your yarn leaving a long tail
Row 14. Change color to white. ch 1, *2 scTBL, incTBL* rep. from *a* to end of row, 2 scTBL
Row 15. ch 1, sc to end of row
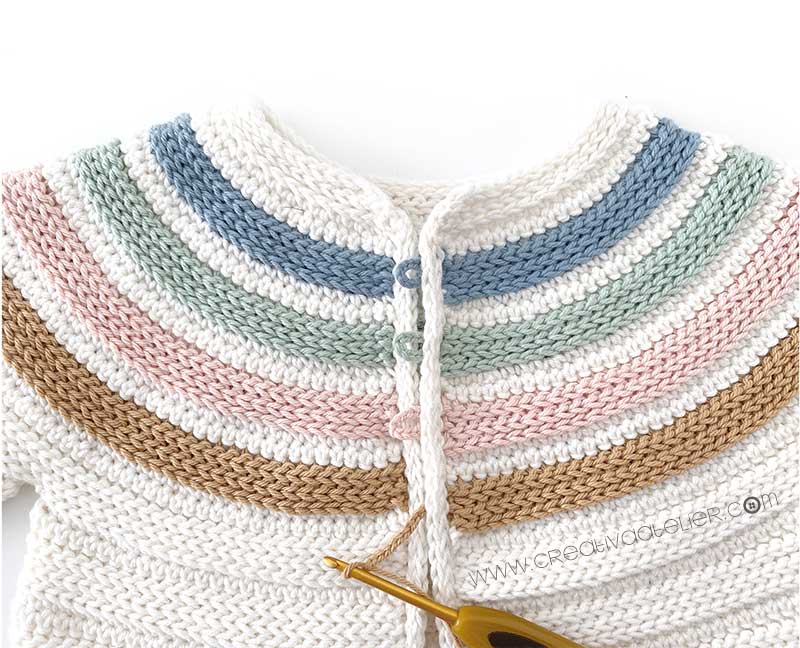
The yoke part of the jacket motif is made up of 8 rows in total that we will repeat: the first 2 rows (row 6 and row 7) which we will work using white yarn, and 6 rows that we will crochet using the color yarns (row 8 to row 13).
While we are working the yoke section, each time you change to white, the first row will be a row of increases. In this way, on the 6th row you should crochet *1scTBL, 1 incTBL* until the end, in the 14th row. *2 scTBL, 1 incTBL, and so on in the following rows that you increase *3 scTBL, 1 incTBL*, 4scTBL, 1 incTBL*, etc…
Remember that if it’s easier for you to follow the row by row instructions, in order to know exactly in which rows you need to change color or increase without having to do the count yourself, you can get the pattern for the Ginger Jacket in the tutorial size (1-3 months) for just 2.99 € or in any of the other available sizes for 3.99 €.


2. Divide the stitches for the front pieces, the sleeves, and the back.
Once all of the yoke
To do this, from one end, count 27 stitches and place a marker on the last stitch to make one front piece, count 40 stitches and place a marker on the last stitch to make a sleeve, count 57 stitches and place a marker on the last stitch to make the back, and count 40 stitches and place a marker on the last stitch to make the other sleeve. You should have 27 stitches left, which will form the other front piece.

Now that we have our work divided, we’re going to crochet the front pieces and back together to form the whole body of the crochet baby jacket.
To do this, crochet 27 scTBL until the first marker, skip 40 stitches of one sleeve, crochet 57 scTBL of the back until the third marker, skip 40 stitches of the other sleeve and crochet the 27 final stitches.


3. Crochet the body of the crocheted baby jacket
Keep crocheting all the stitches of the body of the jacket until you have completed the motif 6 more times.
Remember that the motif is made up of these rows:
*Row 1. ch 1, scTBL to end of row
Row 2. ch 1, sc to end of row
Row 3. ch 1, ss to end of row
Rows 4-8. ch 1, ssTBL to end of row *

Polish the ends of the front pieces of the crochet cardigan
Single Crochet the stitches from one edge of the front opening and crochet 3 rows all with ssTBL. Weave in loose ends. Repeat the same process on the other side of the opening.


4. Crochet the sleeves of the crochet baby cardigan
Resume the 40 stitches for the sleeves and crochet making the motif until you have completed the stripes 7 times or until the sleeve measures about 16 cm.

Cut your yarn leaving it long enough to be able to sew under the sleeves with.

4. Crochet the button loops
With the threads of the different colors that you cut long when crocheting the yoke, chain 10 stitches and sew onto the base of it. You will have made a button loop.
Repeat the same thing with the other three color threads until you have your 4


As I mentioned earlier, the Ginger crochet jacket is designed to match the Pickles Romper, which you can learn to crochet at this link:
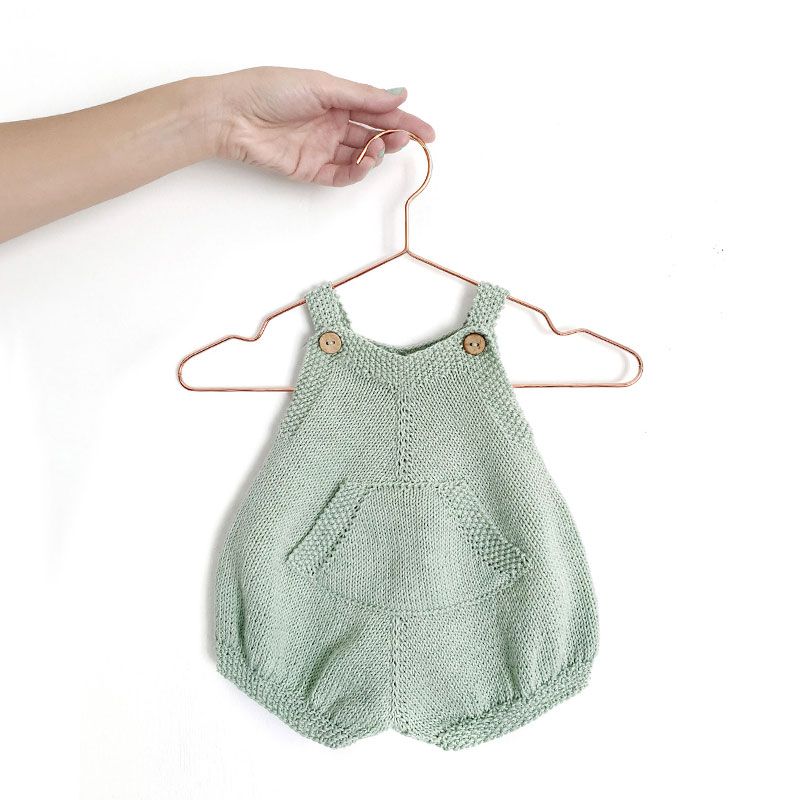
Pickles Romper PDF Knitting Pattern
The Pickles Romper is a fun and easy pattern to follow. It’s perfect for beginners and experienced knitters alike.
I hope you enjoy making these two patterns!


As I always say, this is one of the combinations and possibilities that this pattern offers. On this occasion, I have used an off-white base color and 4 brighter colors, but you can try crocheting it using only two colors, crocheting it all with multicolor stripes or using a pattern of repeated stripes— you decide!
I would love to hear your opinion in the comments and, of course, if you found this tutorial useful or inspiring, share it with the world! And if you decide to crochet your own Ginger Crochet Jacket you can show off the result in networks using #GingerJacket and #CreativaAtelier.
¡Besos!
Design, images and pattern © 2020 Creativa Atelier by Marta Porcel. All rights reserved
Please, respect the designers and their intellectual property. The pattern is for personal use only. Do not distribute copies in physical or digital formats. Using this pattern to make products for sale, workshops, or any other commercial activity is not permitted. If you have a question about what you can do, please write to me at marta@creativaatelier.com
 Knitted Mohair Cardigan – CLOUD CARDI – Pattern and tutorial
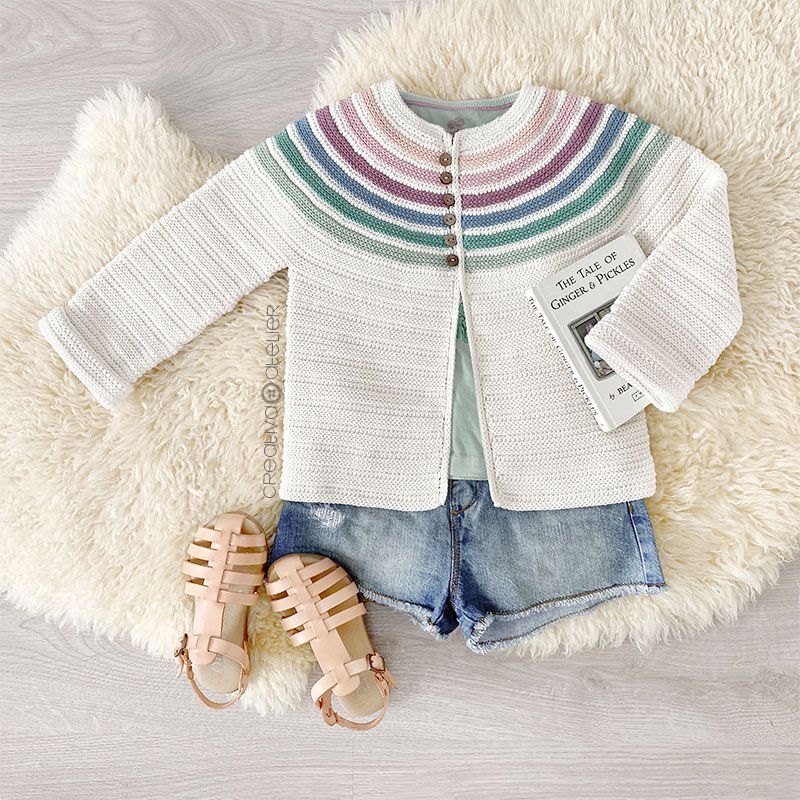
Is there a pattern for the jumper pictured in the finished jacket?
Yes! It is the Pickles Knitted Romper 🥰 https://www.creativaatelier.com/producto/pickles-romper-pdf-knitting-pattern/?lang=en
Can you make a full video on YOU TUBE of you ginger crochet jacket to under stand it easily…..plzzzz
Hi Misbah! Thank you for your interest in my ginger crochet jacket pattern. While I can’t create a full YouTube video, I do offer a detailed PDF pattern in my online store.
This pattern includes step-by-step instructions with every row and stitch clearly explained. You can purchase it on my website for a more in-depth understanding of the pattern: https://www.creativaatelier.com/producto/ginger-crochet-jacket-pattern/?lang=en
Happy crocheting!
I love this sweater. I purchased the 4 year pattern, the biggest option, for my 1 1/2 year old as she is a BIG kiddo. Unfortunately, I tried it on her before I started the arms, and it just barely fit. Would you recommend a larger hook or yarn or any suggestions? I don’t mind starting over. I would just really love to make this for her.
Hi Jamie,
The measurements for the Ginger Crochet Jacket in size 4 years are 34 cm in width and 38 cm in length (from shoulder to hem). The gauge is 23 stitches and 26 rows in single crochet, which should measure 10×10 cm.
If your jacket or gauge turns out smaller than expected, there are primarily two factors to consider:
The yarn you are using might be thinner than the one recommended in the pattern. Even a slight variation in yarn thickness can lead to significant differences in the final size of the garment.
Your tension while crocheting may be different from mine. Did you check your gauge before starting? Have you experimented with using a 3.5 mm or 4 mm crochet hook?
In both cases, the solution remains the same: check your gauge and ensure it matches the specified measurements. It’s a good idea to crochet a swatch that’s at least 15×15 cm to confirm your gauge.
If your swatch is smaller, it means you crochet tightly or your yarn is thinner than suggested. In this situation, try to relax your tension and crochet a bit looser. You can also consider using a thicker crochet hook or a bulkier yarn if necessary.
I hope these tips help you adjust your jacket to your liking and achieve a satisfying result!
Best regards,
Hi Shandra! You have to chain one before every row 😉
Good day,
I love this jacket pattern but finding it extremely difficult to cope with the slip stitch rows, just takes too long to get through a row. I have decided to just continue with sc stitches.
Sad.
Carol-Ann
Hi Carol-Ann!
The secret when crocheting slip stitches is the tension. If you find it difficult to pass your hook through the stitch, you can try to crochet looser or use a thicker hook. In any case, It requires patience, but the result is worth it! 😉
Hi Marta, I am going to study your tutorial and then give this beautiful jacket another try. I just have to persevere, it is such a beautiful pattern.
Carol-Ann
think the same, way too difficult to make the sstbl rows, I have started for about 20 times… I wish it was easier because the result is great, Not in my case… and I have tried with a bigger hook also. Is by any chance a knitt pattern for this jacket? At the end the ss looks like knitted
Hello Marta, l think this cardigan is adorable but l am not finding it easy to follow the crotchet pattern. Do you have something similar knitted?
Thanks!
I love your designs!!
Doreen
Hola! Hace unos dias compre el pattern por Ginger Crochet Jacket por 6-9 meses. Tengo una duda con respecto a Row 6: *1scTBL, incTBL* rep to end of row, esto lo entiendo, pero despues dice 2scTBL – a que se refiere esto? Porque en el blog cuando hablas de los incrementos, no mencionas el 2scTBL. Tengo que parar antes del fin y los ultimos 2 seran: 1scTBL y 1scTBL? O esta una otra forma de decir que en el ultimo lazo siempre es un incremento con 2sc en el mismo lazo? Si hago asi, un incremento final, la linea no es tan derecha, la ultima puntada resalta – es normal? Gracias!
¡Hola! 2 scTBL es lo mismo que tejer 1 scTBL, 1 scTBL. cada uno en un punto distinto. NO es un aumento. Más tarde ene l patrón encontrarás 3 scTBL, 4 scTBL, 5 scTBL.. el primer número indica el número de puntos y las letras indican el tipo de punto.
To esto en la versión en Inglés del patrón, en la versión en español las abreviaturas vienen en español, igual que en el post.
Lovely pattern! Would it be possible to get some idea of the dimensions of the neckline for 1-3 month size? I think I may be crocheting very tightly as the yoke part is turning out quite small – first 6 rows are 19.5 cm in length. Does the row-by- row pattern include final dimensions? Many thanks.
Hi! Yes, the pdf pattern includes a garment drawing with all the measurements: neckline, total width and length of the garment, width and length of the sleeves, length of the yoke, length from armhole to hem, etc. The neckline measurement should be 25 cm, so I imagine you have crocheted the initial chain too tight.
Thank you so much Marta! I have restarted and indeed used a looser tension which resulted in similar neckline dimension to 25 cm (my fingers are also grateful!) I will see how this turns out for the smallest size, but I definitely see myself making this again in the larger sizes and will get one of your patterns for easier reference 🙂 Thanks again!