


Hi! Today I bring you the pattern and tutorial to make your little ones a romantic knitted dress with ruffles
The SEASIDE Knit Dress is light, fresh, feminine and very romantic. A staple in any baby and girl hand-knitted wardrobe!
Materials
To make the Seaside Knitted Dress, we have used the following:
- 6 balls of Drops Safrán Cotton yarn (50g-160m) color 50 Mint.
- 3mm straight knitting needles.
- 3mm circular needles. (optional). They will be very useful to work on the part of the skirt, whether you decide to knit it in the round, or flat.
- Tapestry needle
- 4 buttons
As I told you, I used Drops Safrán to knit the SEASIDE Dress, but you can replace it with any yarn with similar yardage and gauge. , such as Anchor Pure Baby (50g-165m), Katia Fair Cotton (50g-155m) or DMC Natura Just Cotton (50g-155m).
Stitches and techniques
Don’t be impressed by the result! To make the SEASIDE Knit Dress, you won’t need to master advanced knitting techniques. With the most basic techniques, you will be able to make it with your own hands. Below I describe all the stitches and techniques that we will use for today’s project, and by clicking on each of them, you can watch a video to clarify if there is doubt.
- Cast on
- Garter Stitch
- Stockinette stitch
- Increase by knitting one stitch in the front and back of a stitch
- Knit 2 stitches together
- Pick up stitches
- Bind off
- Increase stitches at the edge
- i-cord bind off
Abbreviations
st/sts: stitch / stitches k: knit p: purl KFB: increase knitting one stitch in front and behind yo: yarn over. . k2tog: knit two stitches together
Available sizes
In today’s post, you can learn how to knit, completely free of charge, the SEASIDE Dress in size 3-4 years, but if you need the PDF pattern, to be able to download it, make annotations, consult the indications row by row and not have to depend on the computer or mobile, you can get it in the tutorial size for only 2.99 euros.

PDF patterns are also available in sizes:
And if you prefer, you can get all sizes at a big discount when you buy them together!. Click here to check it out.
How to make the SEASIDE knitted dress – SIZE 3-4 YEARS
Knit the body of the dress
Knit the first part of the back
We will start by casting on 4stitcheshs and knitting 3 rows in garter stitch.
Afterwards, knit 39 rows more ins stockinette stitch, starting with a purl row

Knit the right armhole
From here, we’ll start shaping the right armhole.
In the next right side row, bind off 27stitchess, and we knit until the end of the row. You’ll have 19 stitches on your needle.
Bind off two stitches at the beginning of each right-side row until you have 9 stitches.
Knit these 9 stitches for 15 rows.

Knit the front of the right shoulder
In the next right-side row, cast on 27 sts and knit to the end. You’ll have 46 sts.
Knit 14 rows to stockinette stitch

Knit the neck
Bind off 2 sts at the beginning of each right-side row and knit until the end, until you have 30 stitches in your needle.
Knit 10 rows in stockinette stitch

Knit the other half of the bodice
Once you have reached the center of the bodice, you only need to knit the other half, following the same directions but reversing.
That is, in the reverse direction of what you have already done.
Start knitting 10 rows in stockinette stitch, increase the other side of the neck until you reach the left shoulder, knit the shoulder, decrease for the armhole and knit the other part of the back. All this, using the same row count as in the right half.

Remember that if you find it easier to follow the row-by-row detailed instructions, you can get the Pattern of the Seaside Knitted Dress in the size of the tutorial (3-4 years) for only 1.99 euros or in any of the other available sizes for 3.99 euros each.
Advantages of the PDF pattern
- You can download and consult it whenever you need
without relying on a mobile connection. - You can print it to keep it by your side while you are knitting, making annotations, tracking marks, etc…
- You will have all the detailed instructions, row by row
and stitch by stitch, without having to bother making calculations. - You will have a graphical guide to the pattern. A diagram where you will see in a very visual way the shape of the garment, the disposition of the stitches, the rows, increases
and decreases, etc. - You will contribute to the maintenance of this blog so we can continue spending time together😉
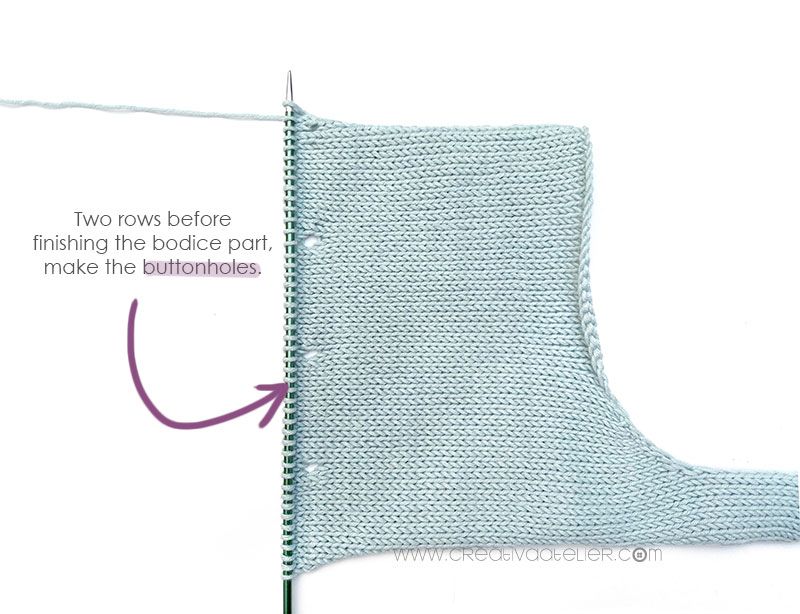
Open the buttonholes
Two rows before finish knitting the bodice part, we must make the buttonholes.
To do this, k 2, *yo, k2tog, k 9 * repeat from *a* 3 more times.
Knit the next row and cast off all stitches using an i-cord bind off.
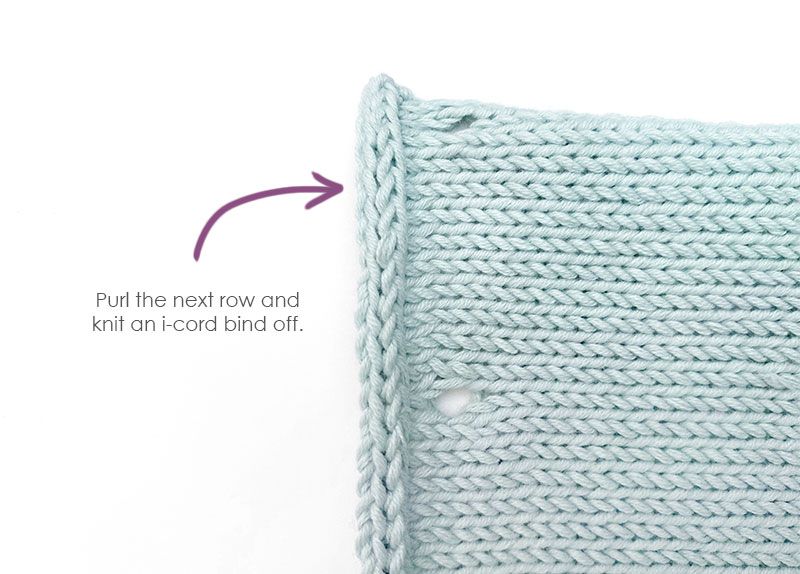
The i-cord bind off is very decorative and very easy to knit. I am sure that once you learn how to do it, you’ll want to use this ending over and over again! You can learn how to knit the i-cord bind off by watching this video.
Turn on English subtitles by clicking the CC icon at the bottom right corner of the video
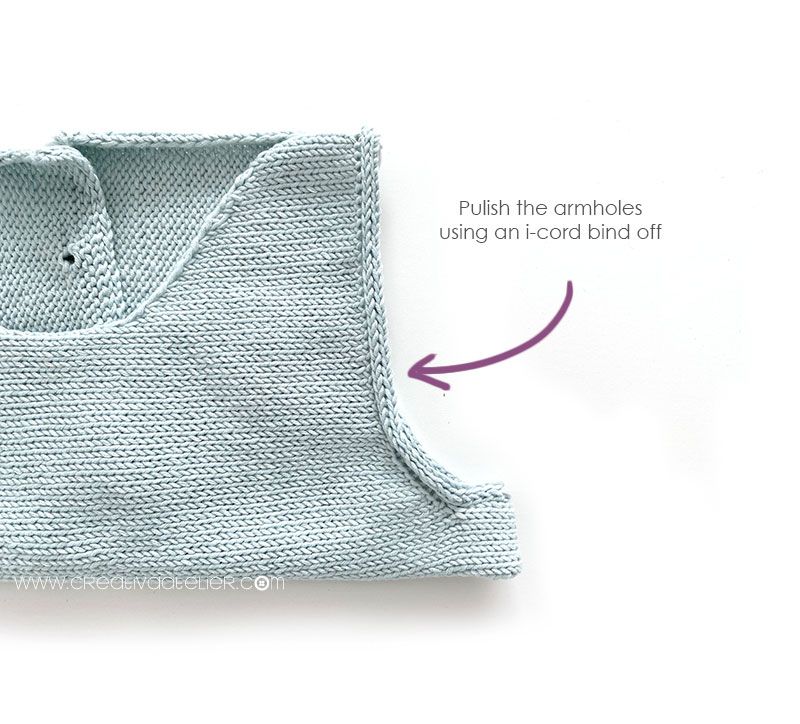
Armhole ending
With the wrong side facing you, pick up the stitches of the armhole. Once you have the stitches picked up, knit an i-cord bind off.
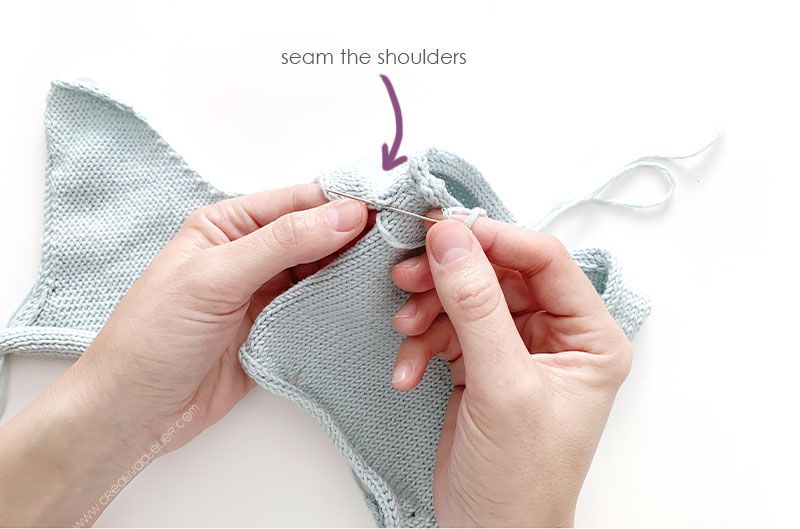
Sew the shoulders with an invisible seam.
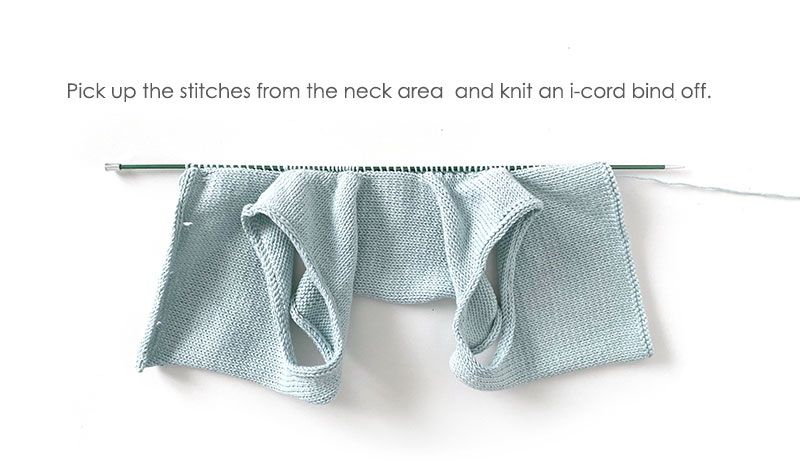
Neck ending
Pick up the stitches from the neck area by inserting the needle from left to right (wrong side facing you) and knit an i-cord bind off.
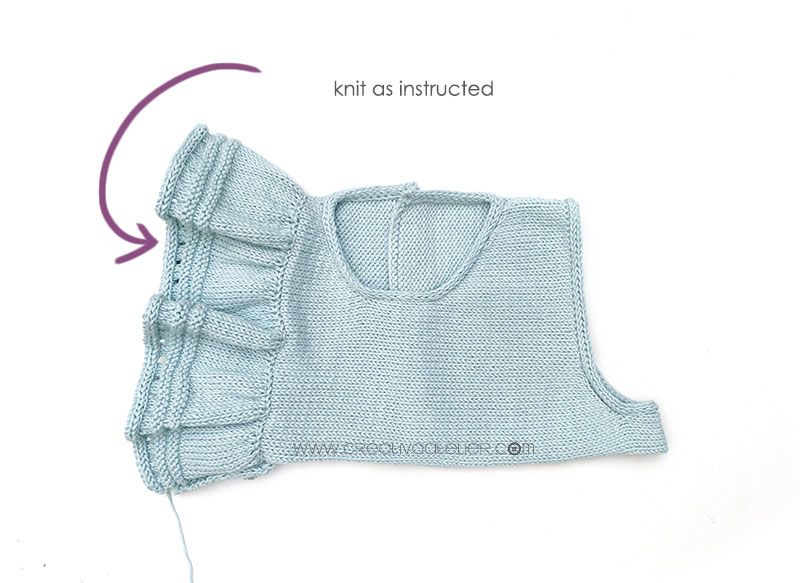
Knit the ruffles
Left ruffle
For the left ruffle, pick up the stitches from back to front.

1. Knit all the sts
2. KFB all sts (You will have doubled the number of sts)
3. Purl all sts.
4-17. Knit Stockinette stitch
18. Purl all sts.
19-20. knit all the sts
21-22. Purl all the sts.
23-24. Knit all the sts.
Purl all the sts.
26. *k2, yo, k2tog* repeat from * a * to the end
27. Purl all the sts..
28. i-cord bind off.
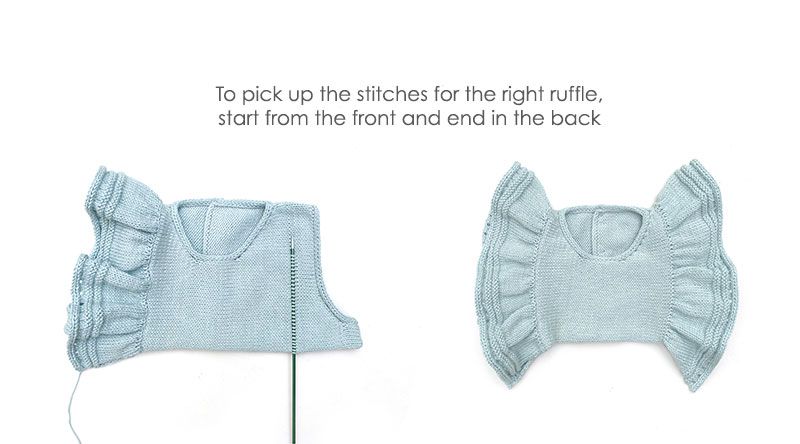
Right ruffle
To pick up the stitches for the right ruffle, start from the front and end in the back. Knit the ruffle according to the same directions as the previous one.
Knit the skirt of the dress
You can knit the skirt in one piece with circular needles or with straight needles making a side seam.
To knit the skirt with circular needles…
Mount the back of the buttonholes on top of the other part, so that they overlap three stitches on both sides. In this way, we will form the placket.
Insert the needle into one stitch of one side and another from the other and pick up 3 stitches working the two parts together.
Pick up the rest of the stitches of the bodice taking special care in the area of the ruffles, where you will have to pick up the stitches of the bodice together with those of the ruffle to get them together.
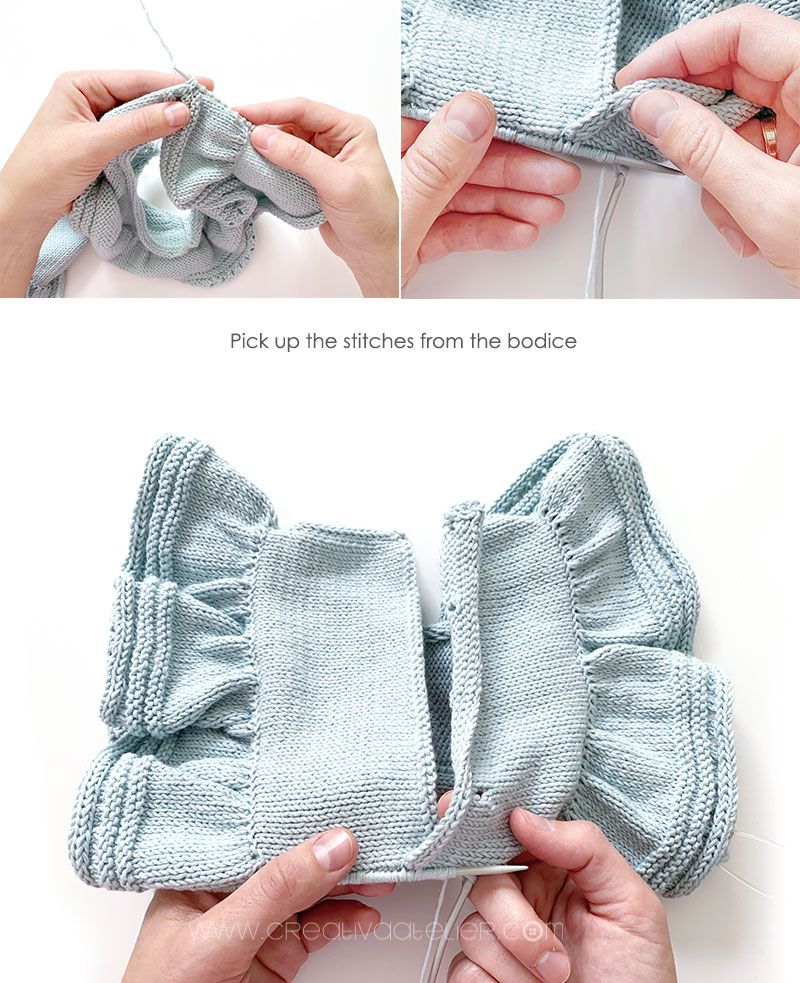
Once you have all the contour stitches picked up, purl two rows
In the next row, we’ll work a few increases to give the skirt more fullness. To do this, *k3, KFB* repeat from * a * to the end.
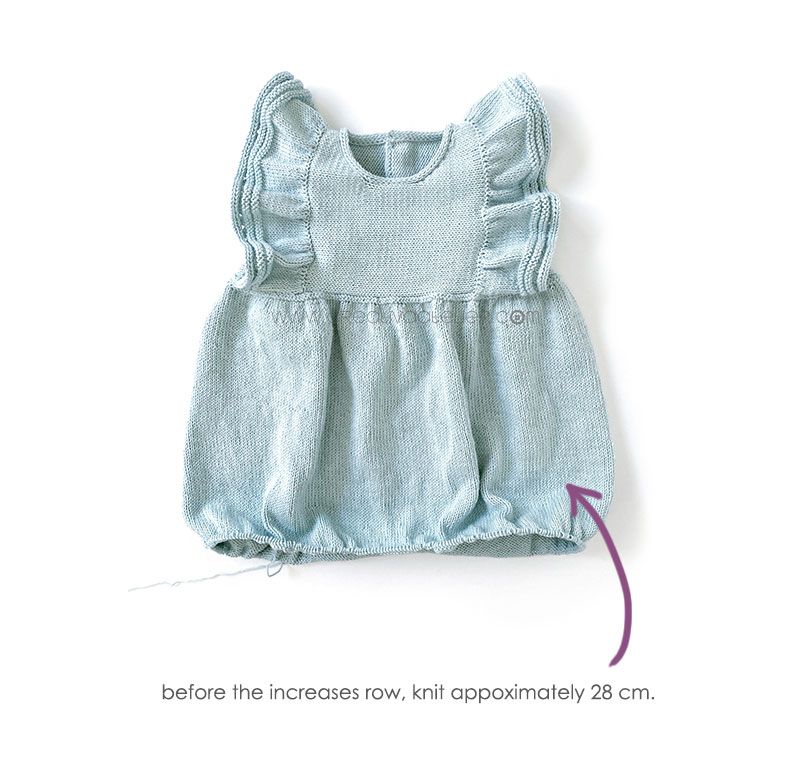
Work in Stockinette Stitch approximately 28 cm.
To form the skirt ending you should knit:
Rnds. 1 and 2. Purl all the sts.
Rnds 3 and 4 . Knit all the sts.
Rnds. 5 and 6. Purl all the sts..
Rnd 7. Knit all the sts.
Rnd 8. *k2, yo, k2tog* repeat from * a * to the end
Rnds 9 and 10. Knit all the sts.
Rnd 11. i-cord bind off.

To knit the skirt with straight needles…
Pick up the stitches under the bodice starting on the side, just below the left armhole.
When you are 3 stitches away from the placket, mount the back of the buttonholes on top of the other part, so that three stitches are overlaped on both sides. In this way, we will form the placket.
Insert the needle into one stitch of one side and another from the other and pick up 3 stitches working the two parts together.
Pick up the rest of the stitches under the bodice.
Thus, although you will have a seam on the skirt, it will remain on one side and, once stitched with an invisible seam, will not be noticeable.
Final touches
To finish, you must sew the buttons facing the eyelets and weave in all the loose ends. You’ve got the SEASIDE knitted dress ready to impress!


As you can see, although knitting the skirt with 3mm needles is not a day’s task and requires patience, the effort is well worth it! I’m sure if you decide to make this knitted dress, you’re going to fall in love with the result.
I would love to hear your opinion in the comments below, and of course, if you found this tutorial useful or inspired you, I hope you share it with the world! If you decide to knit the SEASIDE Dress you can show off the result on social networks using #SeasideDress and #CreativeAtelier.
Kisses!

Design, images and pattern © 2020 Creative Atelier by Marta Porcel. All rights reserved.
Please respect the designers and their intellectual property. Pattern for personal use only. Do not distribute copies in physical or digital format. It is not permitted to use this pattern to make products for sale, workshops or any other commercial activity. If you have any doubts about what you can do, please write to me at marta@creativaatelier.com
 GINGER Crochet Jacket – Pattern & Tutorial
It’s just so adorable! Beautiful work.
Hello, thanks for sharing! I am wanting to make this dress soon but would like to know if MillaMia Naturally Soft Cotton would be a nice replacement for the yarn. I can’t Drops Safran here in the states.
Wow!! Love it. So beautiful!
Hellooo I loved the dress wanted to make one for my god daughter for her 1st year birthday which one should I buy?? The 6-12 months or 12 to 24!?? Thank you so much!