


Hello Creative! Whenever my daughter sees her baby pictures wearing the Watermelon Knitted Romper, she asks me to knit her a watermelon garment again. I’ve been putting it off for several seasons for one reason or another, but this spring-summer, she’s finally going to enjoy her long-awaited watermelon handmade cardigan! 🤗 She’s as happy with it as I am with the result!
Available sizes of the SANDIA Knit Cardigan
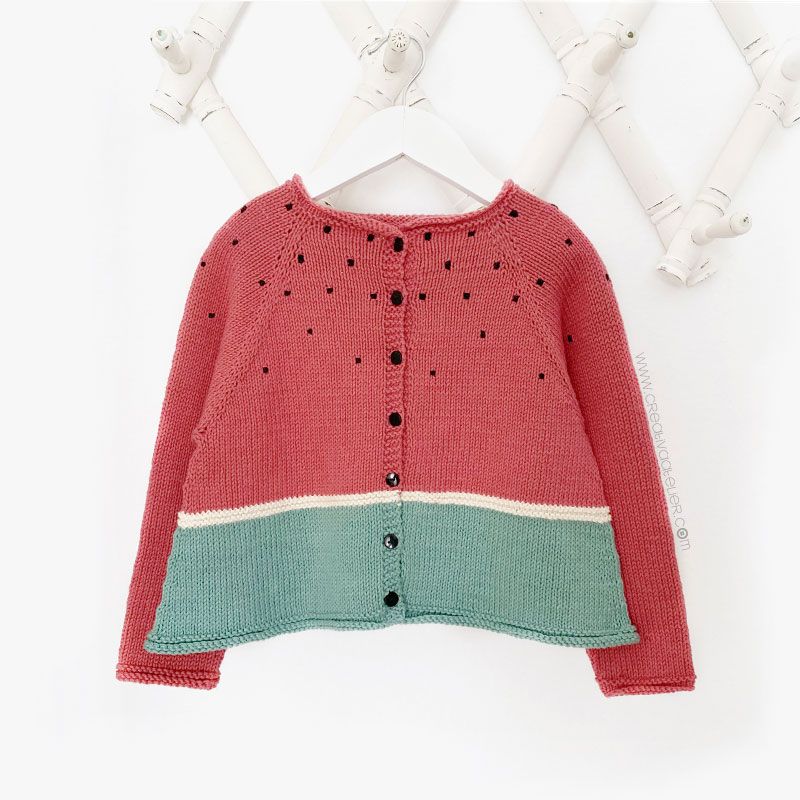
In today’s tutorial, I show you how to knit the SANDIA Cardigan in size 4-6 years. This is the size that you can see in the photos at the end of the post, but this same model is also available in sizes 1-3 months, 3-6 months, 6-12 months, 12-24 months, 2-4 years and 6-8 years.
Whether you need a different size besides the one in the tutorial or find it easier to knit with detailed instructions row by row and stitch by stitch, you have the downloadable and printable PDF pattern at hand! Click on this link or in the following image to choose your size!

As in all my patterns, you have the option to buy separately one size or get the 7 sizes of the pattern available at a great discount. Click here to get the 7 sizes of the SANDIA Knitted Cardigan.
Materials to make the SANDIA Cardigan
- Lanasalpaca Just Cotton (50 gr = 125 m.) DK weight. A fiber of exceptional quality and extra soft touch, which knits super nice and even. Plus, garments knitted with Just Cotton by Lanasalpaca are machine washable with no worries, which is very important when knitting for children’s clothing. This yarn is 10 out of 10👌🏻
- 3 skeins in color A028 – Coral
- 1 skein in color A027 – Ecru
- 1 skein in color A030 – Emerald.
- 3 mm circular needles. It can be knitted with either straight or circular needles. I recommend knitting with circular needles on this occasion, as they allow you to carry many stitches at once without the stitches being too tight. Above all, you can see the result while knitting when using circular needles because it is a flexible cable instead of a rigid needle. Otherwise, I use them as straight needles, knitting back and forth, turning the work every time I finish a row. You will also need them for knitting the sleeves, either flat or circular.
- 4 stitch markers
- 2 stitch holders or waste yarn
- Tapestry needle
- Black thread to embroider the seeds
- 7 buttons
Gauge
10 x 10 cm = 23 stiches x 31 rows in Stockinette Stitch
Knitting stitches and techniques / Abbreviations
- Cast on
- Knit stitch (k)
- Purl Stitch (p)
- Make 1 Right (M1R)
- Make 1 left (M1L)
- YO. Yarn Over
- Knit 2 stitches together (k2tog)
- Slip 1 Knit 1 Pass Slip Stitch Over (s1k1psso)
- Bind off
How to knit the SANDIA Cardigan – SIZE 4-6 YEARS
It is very important to notice that in this pattern, on even rows, we will work stitches as they appear, that is, knit the knit stitches and purl the purl stitches, unless it is expressly stated in the text.
Knit the neck
Cast on 84 stitches and work in Stockinette Stitch the next 5 rows.
In row 6 (wrong side row), knit all the stitches to delimit the separation between the neck and the yoke.

Knit the yoke area
From row 7 onwards, we will start shaping the yoke by working symmetrical increases distributed in each of the 4 rows of the raglan. We will divide the stitches from the fronts, sleeves, and back.
For even edges, it is advisable always to slip the first stitch without knitting knitwise.
Row 7. k14, M1R, k1, place marker, k1, M1L, k12, M1R, k1, place marker, k1, M1L, k24, M1R, k1, place marker, k1, M1L, k12, M1R, k1, place marker, k1, M1L, k14.
At the end of the row, you will have increased 8 stitches, and you will go from 84 stitches to 92 stitches in total.
From this point on, on both even and odd rows, each time you reach a marker, slip it to the right needle and continue knitting.
Row 8 and all even rows. k4, purl until there are only 4 stitches left, k4.
Row 9. Eyelet row. k15, M1R, k2, M1L, k14, M1R, k2, M1L, k26, M1R, k2, M1L, k14, M1R, k2, M1L, k12, YO, k2tog, k1. (100 sts)
IMPORTANT! You must open an eyelet every 16 rows, always in odd rows or right side facing. That is to say, in rows 9, 25, 41,…
We will continue knitting our SANDIA knitted Cardigan, alternating one knit row, in which we will work the increases, with one purl row without increasing.
You should keep in mind that by increasing one stitch on each side of the guide, if the first increase is 15-14-26-14-15, the next increase will be 16-16-28-16-16-16, 17-18-30-18-17… and so on until you have a total of 276 stitches on your needles.

Remember that if you find it easier to follow the instructions row by row, to know exactly the number of stitches and increases in each row, and the exact place of each eyelet, you can get the SANDIA cardigan pattern in the tutorial size (4-6 years) for only 2,99 € or in any of the other available sizes for 3,99 €.
Divide the stitches from sleeves and body
Once we have these 276 stitches, we will separate the sleeves, front and back stitches to work the body of the cardigan.
To separete the stitches of the sleeves, knit 39 stitches of the first front, place on hold 62 stitches of the first sleeve on a stitch holder or waste yarn, cast on 4 stitches, knit 74 stitches of the back, place on hold 62 stitches of the second sleeve, cast on 4 stitches and knit 39 stitches of the second front.
At the end of the row you will have 160 stitches on your needles to knit the body.


Knit the body of the cardigan
We will begin to form the body of the cardigan by knitting 4 rows in stockinette stitch.
To give the knitted cardigan a flared shape, we will make two symmetrical increases on each of the two sides.
To do this, k 39, M1R, k1, place marker, k1, M1L, k74, M1R, k1, place marker, k1, M1L, k39.
You will have to make an increase on the sides every 5 regular rows, that is, if you worked increases on row 5, you will also have to increase on rows 11, 17, 23, 23, 29,…. as follows:
Knit to 1 st before reaching marker, M1R, k1, slip marker, k1, M1L, Knit to 1 st before reaching marker, M1R, k1, slip marker, k1 pd, M1L, knit to end.
Remember that you must also continue to form the closing placket of the cardigan by knitting the first and last 4 stitches (in both knit and purl rows) and opening the eyelets every 16 rows.
Knit until you get 6 cm of fabric from the armhole.

At this point, if you anticipate that you will have enough cotton (or wool) to finish the sleeves, you can continue knitting the bottom and knit the sleeves last.
In my case, as you can see in the photos, I left the body on hold and knitted the sleeves. I had some doubts about whether I would have enough material to finish the sleeves, so I left the hem undone in case I had to undo some rows of the hem to get some extra cotton for the sleeves.
Knit the sleeves (circular version)
As I said at the beginning of the post, you can knit the sleeves either flat or circular. Here I detail how to knit the sleeves of your cardigan in circular, but if you want to knit them flat, in the PDF patterns, you will find all the detailed instructions to knit them either way.
SANDIA Knitted Cardigan Pattern
Go back to the stitches on hold for one of the sleeves by inserting the needle from right to left (wrong side facing you). You will start knitting on right side or odd row.
Pick up 4 stitches (from the underarm). Place a marker in the center of those 4 sts in the underarm area. You will have 66 sts for your sleeve.


Knit 4 rounds in Stockinette Stitch.
In round 5, we will start knitting decreases to shape the sleeve:
Rnd 5. k1, k2tog, knit until you have 3 sts left to reach the marker, s1k1psso, k1.
From now on, alternate 4 regular rounds and 1 decrease round (Rnds 1-5) until you have 38 stitches. Then knit 6 more rounds in stockinette stitch.
Now it’s time to form the cuff of the Watermelon cardigan. Purl the next round, then knit 4 more rounds in stockinette stitch and bind off all the stitches.

Knit the other sleeve in the same way.

Knit the lower part of the cardigan
When you have knit approximately 6 cm from the armhole, change the color to white and knit 4 rows in GARTER SITCH.

Change the color to green and continue knitting without forgetting the increases, the buttonhole stitches and the edge stitches for the placket.
Knit approximately 8.5 cm with green color.
Now it’s time to form the bottom part of the SANDIA cardigan. In purl row (wrong side facing), you must knit all the stitches, to delimit the separation between the body and the lower part of the cardigan.
Knit 4 more rows in stockinette stitch and bind off all the stitches.

Finishing touches
Finally, weave in all the loose ends, sew the buttons and embroider the watermelon seeds on the yoke.
It is not necessary to have embroidery skills to embroider the seeds.
You can see how to do this embroidery on your Watermelon Knit Cardigan in the following video:


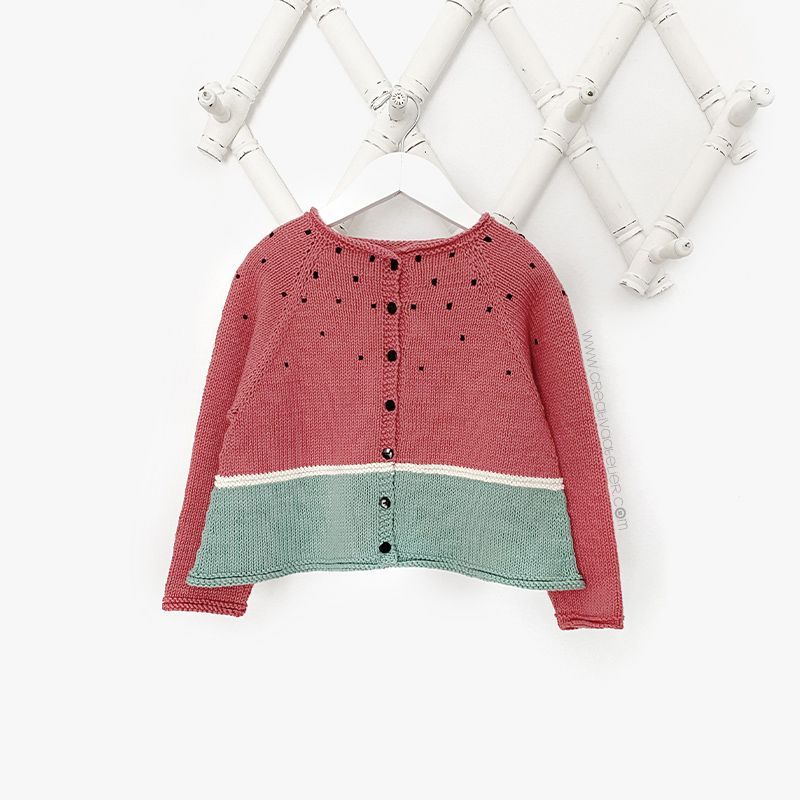
As you can tell, it’s a very simple project to knit, but at the same time the result is very cute and eye-catching. the little ones love it! 🍉❤️🍉❤️🍉❤️


I hope you liked it, and I encourage you to knit the watermelon knit cardigan. You will see how it attracts attention wherever it goes!
If you liked this tutorial and found it inspiring, leave me your comment below, I love to read your opinion 🤗.
If you feel like it, you can share your project on social media with the hashtag #SANDIAcardigan and #creativaatelier, so we can all see your creation. Let’s fill the spring-summer with little knitted watermelons!
Kisses!

Design, images and pattern © 2022 Creativa Atelier by Marta Porcel. All rights reserved
Please, respect the designers and their intellectual property. The pattern is for personal use only. Do not distribute copies in physical or digital formats. Using this pattern to make products for sale, workshops, or any other commercial activity is not permitted. If you have a question about what you can do, please write to me at marta@creativaatelier.com
 SUGAR mohair knitted Shawl – Pattern & Tutorial