


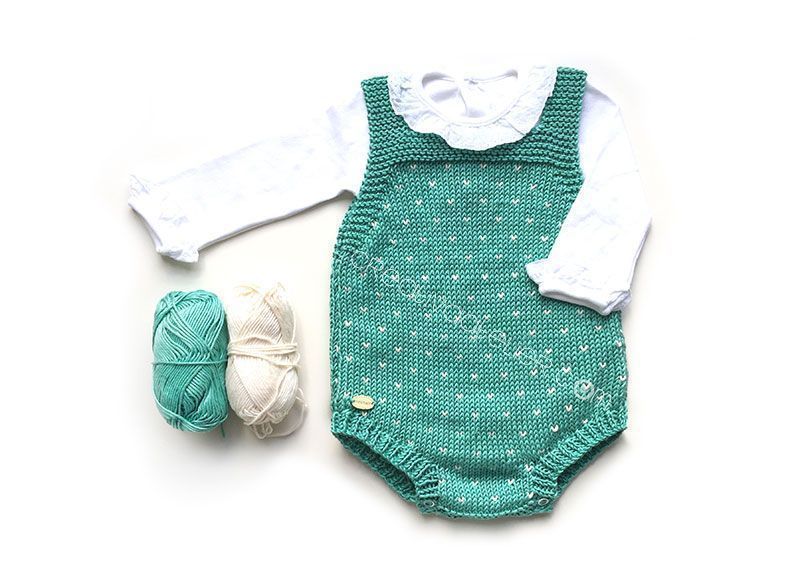
Today we are going to learn how to make a knitted romper perfect for the spring or summer due to the cotton yarn used to knit it. However, as you will see, this pattern is very versatile and you can knit it with wool as well as cotton yarn, that will work for either the winter and summer.
Also, this baby romper pattern is very basic and you can personalize it to your liking, adding “topitos” (as shown in this tutorial), leaving it as is, knitting sleeve flounces, combining various colors or types of stiches… the sky is the limit!
The size shown on this tutorial is 3-6 months, but if you need another size Don’t worry! The Topitos Baby Romper is also available in the sizes New Born, 1-3 months, 6-12 months and 12-24 months. To get the complete pattern that gives you row by row instructions along with the chart, click on the image below or on the following button:
 As usual, you will find the instructions to knit this romper on the text and images, but if you prefer to download the pattern to get row by row instructions and print it to make notes without relying on the cell phone or internet connection, you are in luck because everything is ready for you!
You also have the option to buy all sizes together with a good discount on this other link.
Materials to make the Topitos Baby Romper
On this occasion, the materials we will need to make a 6 months size are:
- 3 balls of 50 grams of cotton yarn for 4 mm needles. Since I cannot resist any green yarn, I chose the color 03 Mint Green from Drops Muskat cotton yarn.
- 1 ball of cotton yarn for 4 mm needles in white.
- 4 mm needles (6 US)
- 4 buttons or snaps fasteners. If you chose to add the buttons, you must keep in mind that you must make the eyelets at the time of knitting the crotch region, if on the contrary, like in this tutorial, you chose to add snaps, you will knit as you will normally since you can add them without the necessity of making eyelets.
How to knit the Topitos Baby Romper Step by Step- 6 months size
1. Knit the front piece of the knitted romper
Knit the crotch region
To start knitting the Topitos Knitted Romper, first of all, cast on 18 stiches and knit 6 rows in garter stitch. This will be the region where the buttons or snaps will go, if you decide to add regular buttons you will need to knit eyelets at this point of the baby romper. On this other tutorial, you will find with images how to knit an eyelet
 After we have these 6 rows of Garter stitch, knit 2 more rows in stockinette stitch and start knitting the white dots of the knitted romper.
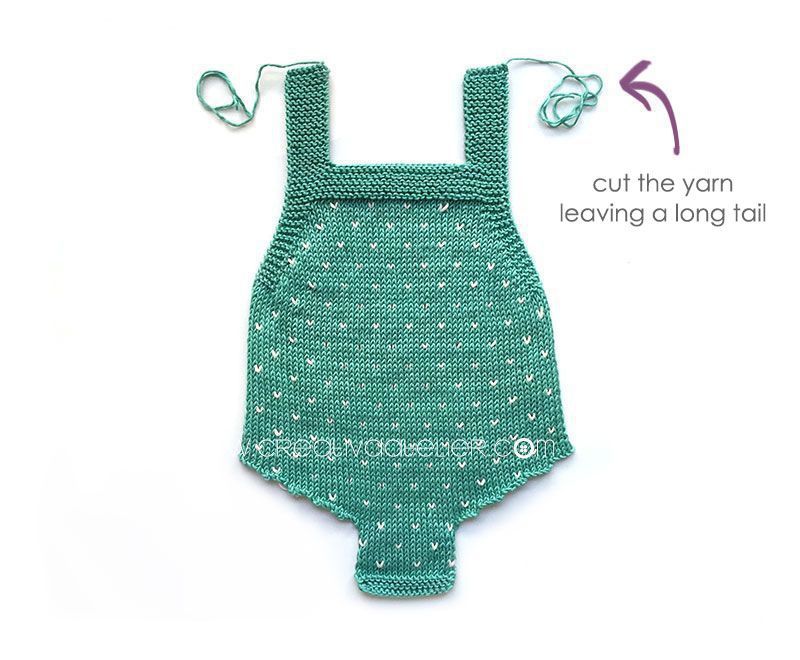
For this, as shown in the images, when you are in the right side of the work, you must knit 4 stitches, and on the next stitch add the white yarn and knit the stitch as you will normally. Do not worry if the yarn is loose, we will tight it shortly. After knitting this first stitch with the white yarn, knit 5 stitches with the green yarn and again knit one stitch with the white yarn using the same string from the previous white stitch. In this way, continue alternating 5 green stitches, 1 white stitch, until the end of the row. When you are done with the row cut the white yarn leaving a 4 or 5 cm tail.

Once the first row of “topitos” is done, knit 3 rows in stockinette stitch with the main color and in the fourth row will be another row of dots, but this time instead of knitting 4 stitches at the beginning, you must knit one stitch and the next stitch will be knitted with the white yarn. In this way, we will achieve the alternating dots look.
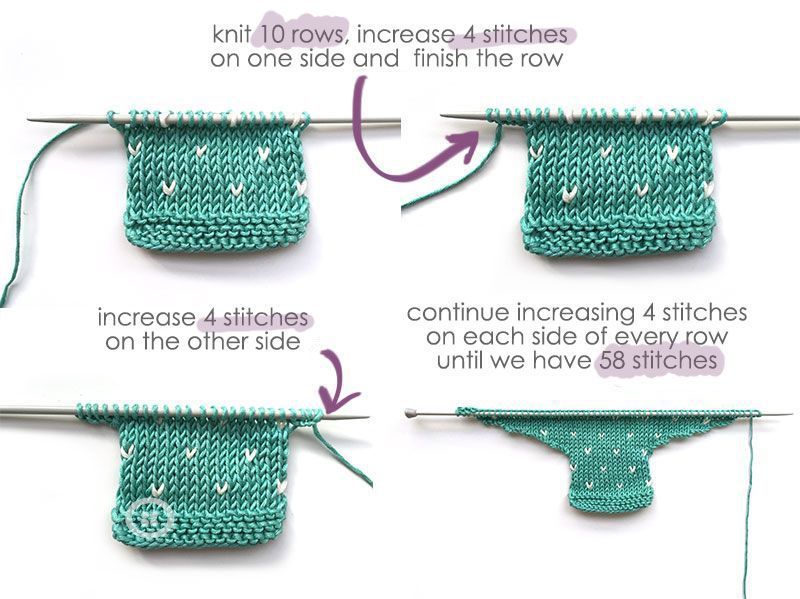
You must knit 10 rows, keeping in mind the established pattern. Once you are done with the rows, we will begin to increase stiches on each side to form the crotch region of our knitted baby romper.
Increase 4 stitches on one side, finish the row and increase 4 stitches on the other side. My preferred method of increasing stitches at the end of the work is the method shown in this video. We will continue increasing 4 stitches on each side of every row until we have 58 stitches.
Knit the body of the romper
This is the simplest part of the knitted romper since it does not have any increases, or decreases, or eyelets, or anything, just stockinette stitch. However, you must be very attentive while you knit as to not skip any white stitch, remember that for every 5 main color stiches, there must be a dot. In this way, we will knit for 35 rows.

Once you have finished the 35 rows, the wrong side of the work should look like this. Do not worry too much about how it looks at this point, since later we will fix all the loose white yarn.
Knit the armholes
For me, the most fun part of knitting this knitted baby romper is this part because you can see it taking shape and you start to get excited.
In this part, you must alternate Garter stitch, which will go on the ends of the work, with stockinette stitch.
We will begin knitting on the wrong side of the work, 5 knit stitches, then purl the rest of the stitches until there are 5 remaining stitches which you will knit.
On the right side of the work (where the stockinette stitch is made) is where we will decrease stitches. To do this, knit 4 stitches and then knit two together, knit the rest of the stitches until there are 6 stitches remaining, knit two stitches together and knit the last 4.
You will have to continue decreasing stitches on the right side of the work until you get 38 stitches. As you keep knitting you will see the garter stitch armholes beginning to take shape as shown on the pictures.

Knit the suspenders of the knitted romper
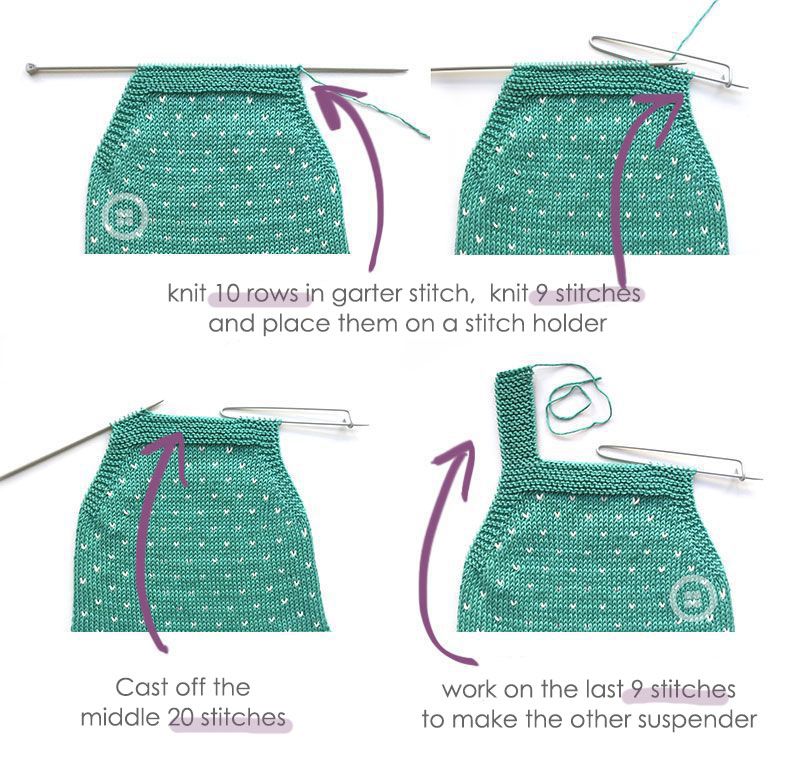
Once you have 38 stitches, knit 10 rows in Garter stitch to make the romper and go on knitting the suspenders.
Knit 9 stitches and place them on a stitch holder. Cast off the middle 20 stitches and work on the last 9 stitches to make the other suspender. The number of rows that you need to knit depends on your personal preference and the length that you need it to be, as a guidance 40 rows will work but you can adjust this by adding more rows if you realize that you want the hand knitted romper with slightly larger suspenders.
2. Knit the back piece of the knitted romper
The back piece of our knitted romper will be knitted the same way as the front piece, although you should take into account some small considerations:
- From the first 6 rows in Garter stitch we will start directly with the increases (remember that for the front piece we knitted 10 rows in stockinette stitch)
- Instead of making 4 increases on the end of each row, we must make 2 increases on each row.
- Finally, this back piece does not have suspenders, since we finished them on the front piece. Therefore once you have knitted the 10 rows in Garter stitch for the romper, we will cast off all the stitches.

3. Join both pieces
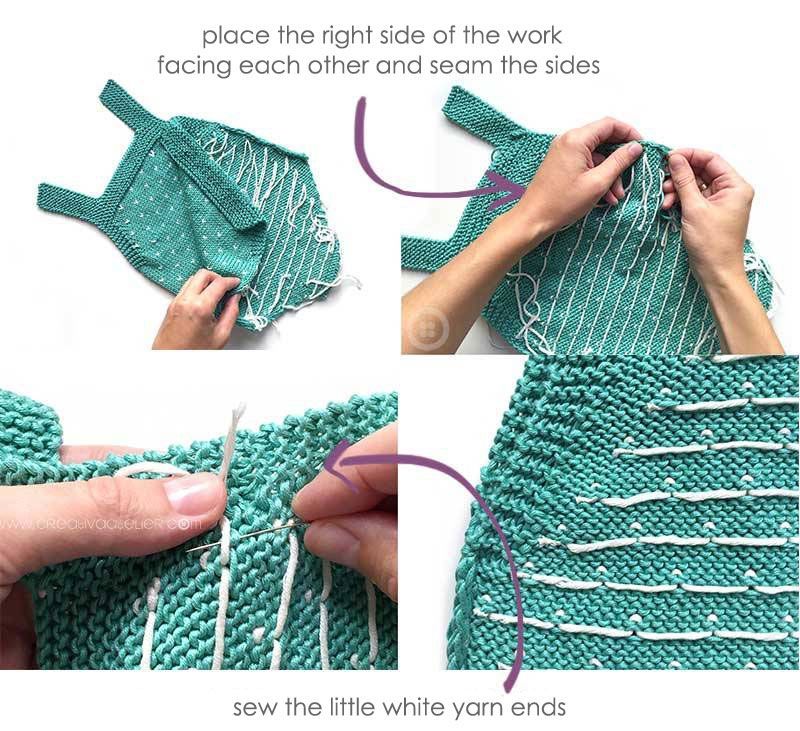
To join the front and back piece of our knitted romper we must place the right side of the work facing each other and seam the sides as usual.
Once we have the two pieces together, it’s time to get rid of all those little white yarn ends that are disturbing the wrong side of our garment. You can choose to tie them with a sewing needle and cut the excess, or sew them with normal thread and needle. And yes, you must arm yourself with patience for this operation, but I assure you that the result is worth it!

4. Finish the crotch region and sew on the suspenders to the body of the knitted romper
Cheer up! we only have to add the final touches!
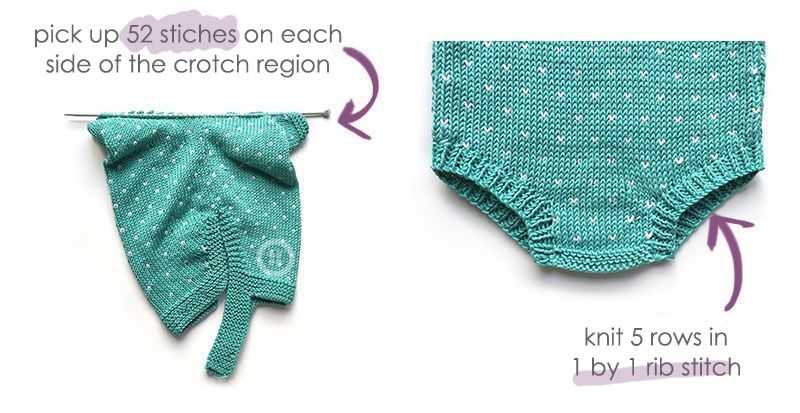
To finish the crotch region and give it a more polished look, pick up 52 stiches on each side of the crotch region, knit 5 rows in 1 by 1 rib stitch (one knit stich one purl stitch) and cast off all the stitches.
Do not worry if when you pick up the stiches you do not end up with 52 stitches, is not important if there are 50, 52, or 56, the only important part is that you pick up the same amount of stitches on both side of the crotch region.
To finish, with a sewing needle, sew on the suspenders to the back of the knitted romper and add the snaps or buttons.
You can learn how to add snaps without the necessity of using a specific machine in this tutorial. It is very simple and with some simple pliers you will have a professional result in your clothes.

In these links, you can find snap buttons at a great price and with a huge variety that you will not find in any physical establishment
[amazon_link asins=’B003LQZFJG,B074JB4XQY,B017K7XK3E,B071Y5NLFQ’ template=’ProductGrid’ store=’creativaateli-20′ marketplace=’US’ link_id=’0c660783-02a6-11e8-a8c6-6b153533df72′]
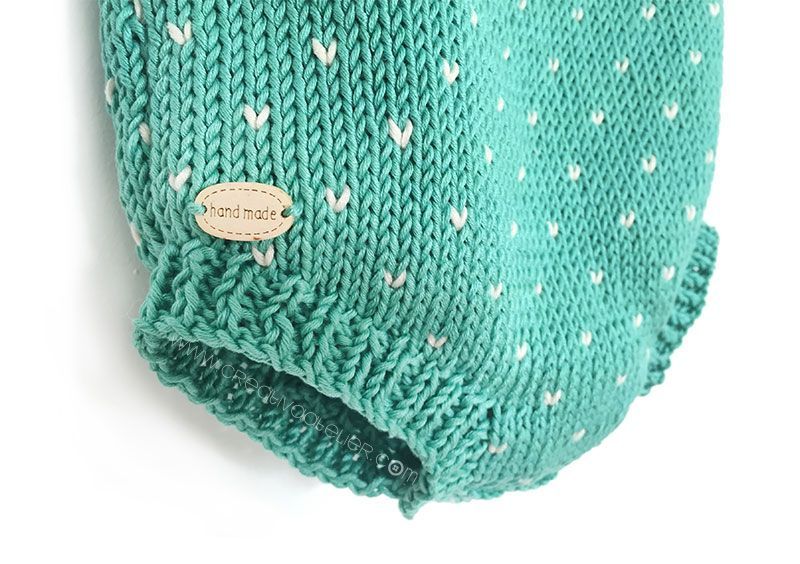

If you want to give your knitted romper an special touch, you can ad a wooden Handmade label.
[amazon_link asins=’B077STY1L3,B01DO3V2VA,B078MGG2WM,B0792516KT’ template=’ProductGrid’ store=’creativaateli-20′ marketplace=’US’ link_id=’674032ae-02a5-11e8-9611-03161cc2fdbd’]
As I said earlier, if you need a downloadable and printable PDF to not rely on your cell phone or the computer to knit the Tpitos Baby Romper(of course easier) and with the row by row instructions, so you don’t miss a stripe! you can get it by following this link:
Topitos Romper Pattern- Size 3-6 months
If you want to knit this beautiful romper in another size and you want to get started right away without having to calculate the number of stitches for your measurements, this time I’ve also made it very easy for you!
Topitos Romper Pattern- Size New Born
Topitos Romper Pattern- Size 1-3 months
Topitos Romper Pattern- Size 6-12 months
Topitos Romper Pattern- Size 12-24 months
Topitos Romper Pattern- 5 baby sizes


This is a type of knitted garment that can be used both in spring-summer, if you choose cotton yarn like the one you see in the images, or in autumn-winter combined with a shirt or body, some tights and a cardigan. You can also use wool to make it, everything will depend on how hot the baby in question is.
Choose the combination you choose, for sure the result will be spectacular!
If you have enjoyed this Topitos knitted romper pattern and tutorial, please, do not hesitate to share it or comment below. I love to hear your opinions and I can try to resolve any questions that you may have if you decide to make it.
Kisses,

Tutorial, pattern and images registered under a Creative Commons licence Creative Commons Attribution-NonCommercial-NoDerivatives 4.0 . Peto de punto a dos agujas “Topitos” -Patrón y tutorial – CC by-nc-nd 4.0 – Marta Porcel
This pattern is for personal use only. Please do not claim this pattern as your own, or sell or distribute it. If you would like to share this pattern, please link to this site and do not repost the pattern on your site. You can sell finished items made from this pattern, but please link back and give credit to Creativa Atelier. Please, respect designers and their Intellectual Property. Thanks!
![Garter Stitch Baby Sweater - [ EASY Pattern & Tutorial ]](https://www.creativaatelier.com/wp-content/uploads/2018/01/Garter-Stitch-Baby-Sweater-0.jpg) Garter Stitch Baby Sweater – EASY Pattern & Tutorial
Garter Stitch Baby Sweater – EASY Pattern & Tutorial![Knitted Teddy Bear Sweater - Baby Knits - [ EASY Pattern & Tutorial ]](https://www.creativaatelier.com/wp-content/uploads/2018/02/teddy-bear-sweater-baby-0.jpg)
So in love with ur pattern… thanks
I’m knitting the 6-12 size, but the actual front across measures 11″. Isn’t that supposed to be the measurement for the entire outfit?
Hi, I’ve just got to the shaping of the arm hole and I’m not sure if I continue with 5 knit stitches on the purl side and then do the reducing, or do I knit 4 stitches? Thanks
Thank you for the darling pattern! Have you published the pattern for the cute shoes shown at the end? They are among the sweetest I’ve seen!
I’m a little confused on the increases. If I add 4 stars on the end, I then have to add another 4
At the beginning of the next row. In actuality I would have to add 8 sts at the end of each row?
Hi Bonny,
As I read it, you increase 4 stitches at the beginning of each row. There is a video link that shows how.
You add four, and then knit all the stitches to the end. At the other end, add 4 and then complete the row.
Hello, this is my second project I am completing from your instructions – I have previously completed the kimono cardigan and leggings.
I am stuck on how to pick up the stitches around the leg hole to do the ribbing. Could you point me in the direction of a video link that shows the technique? Thank you!!!
Hello, what size snaps do you use, please?
Hi!
Is there anyway to get the number of stitches and size for a 0-3 month size?
This free version is for a 6 month size? Thanks
Hi Eman! This free version is for a 6 months size, but you can get the pdf pattern from size newborn up to size 12-24 months from my online store: https://www.creativaatelier.com/producto/topitos-romper-pdf-knitting-pattern/?lang=en
Regards!
Just completed the onsie and it’s so cute. Am looking forward to knitting more. thank you. Free patterns are a blessing to some of us in southern Africa as we can knit items for loved ones as we don’t have an income but manage to put smiles on the mom’s faces. Thank you once again.
Thank you so much for this easy and lovely pattern! Loved knitting it!
Hallo Marta,
Vielen Dank für das schöne Modell😍 !
Um es in Größe 1-3 Monate herzustellen, habe ich einfach 2 Maschen weniger aufgenommen und vielleicht 2 Reihen weniger gestrickt. Nicht sicher ob es ok ist🤔, da ich erst bei der Hälfte des Vorderteils bin, aber es macht schon riesig Spaß🤗. Muss mich beeilen, denn das Baby👶🏼 wächst schneller als mein Werk 🤷♀️
Would you consider showing what changes would need to be made for other sizes? Like 2t, for example? 😬 that would be so awesome!
So cute is it possible to get the pattern without the ads. Printing it out with the ads is difficult. Thank you!
Hello there i’m trying to make this romper but now I’m stump on the suspender.I made one side but i don’t know how to do the other side.i really like this romper and i would appreciate it if you can find time to respond to me.Thank you so much.I’m still new on knitting so sometimes i get confuse.
How do I print the pattern & directions? I don’t see a “print” button anywhere. Darling romper.
Hi Gladys! You don’t have to print anything, just follow the photo tutorial and the written instructions on the post.
What a great tutorial. You made it look so simple. I will have to try this pattern. :). Thank you.
What size would that pattern be? Thanks!
thanks very mach
Thank you ever so much for sharing. Such a lovely pattern.
Andriana